Search

Drop Down MenusCSS Drop Down MenuPure CSS Dropdown Menu

Friday, June 23, 2017

Getting started with Microsoft Graph API in a Xamarin Forms Application

Introduction:
Microsoft offer a different service in the Cloud, Mail, Calendar, Contact, Chat and files from common Microsoft portal and also if you want to integrate to your application, you can access unified API wrapper in the Microsoft graph SDK. In this article you will get understand, how to implement login authentication and Send mail using Microsoft graph API in the Xamarin Forms application   

Prerequisites:
  1. Download and install Visual 2017 Community Edition or higher.
  2. Create Microsoft Account (If you already register Microsoft account, it’s not required)
Getting Start Create Application:
Step 1: You can navigate following URL https://developer.microsoft.com/en-us/graph/quick-start for register app and create sample app.
Step 2: Select the platform and Microsoft will create simple app that connects to Office 365 and calls the Microsoft Graph API.
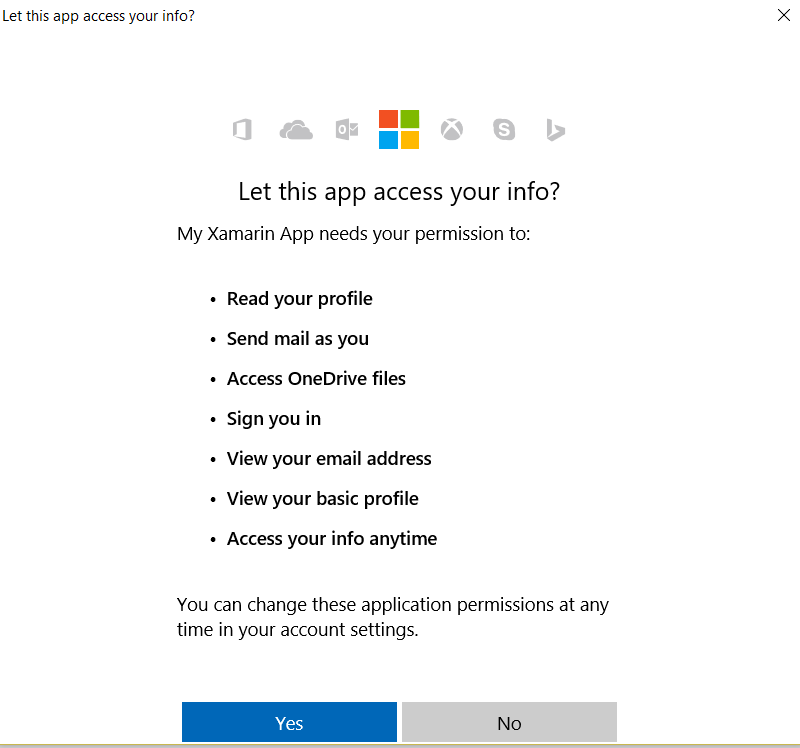
Step 3: Register APP ID: You can register the application using click on “Get an app ID” and it will navigate to Microsoft application registration portal where you will be able to get an App ID and redirect URL. You will need either a School / Work /corporate / Azure AD or Microsoft account.
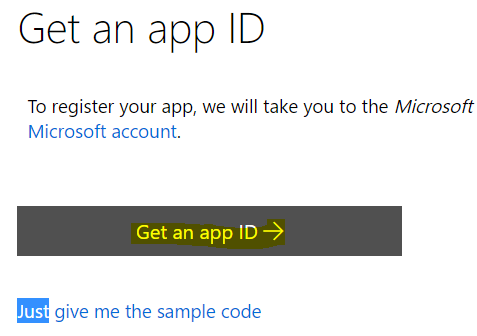
Step 4: Registration Success: after login with your Microsoft account and wait for few second appid and redirect url will generate automatically. if you want to modify or manage your app, you can click on application registration portal .
Step 5: Manage App in Registration Portal: You can manage or edit application from portal in the following App Name, redirect URL, generate new password, application logo, update the permission and click on Save button.
Step 6: Download Sample Code: you can download and unzip the source code > open the source code using Visual Studio. in the Sample application have multiple platform support as iOS, Android, UWP. The code sample will introduce you to authentication and send an email from your account.
Step 7: Microsoft Graph Client Library:
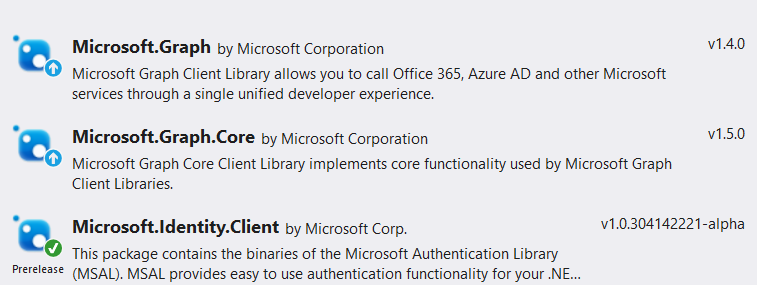
Microsoft Graph Client Library allows you to call Office 365, Azure AD and other Microsoft services through a single unified developer experience so right click on your solution and verify below NuGet package installed in the solution.


Step 8: Configure the project:   Open the App.cs file from XamarinConnect PCL project > replace your client ID and add the user permission scope.
  1. public static string ClientID = "< Update your Client ID > ";
  2. public static PublicClientApplication IdentityClientApp = new PublicClientApplication(ClientID);
  3. public static string[] Scopes = { "User.Read", "Mail.Send", "Files.ReadWrite" };
Step 8: Configure Send mail: Open the MainHelper.cs from XamarinConnect PCL project > update ComposeAndSendMailAsync method as per your requirement
  1. public async Task ComposeAndSendMailAsync(string subject,
  2.                                                            string bodyContent,
  3.                                                            string recipients)
  4.        {

  5.            // Get current user photo
  6.            Stream photoStream = await GetCurrentUserPhotoStreamAsync();


  7.            // If the user doesn't have a photo, or if the user account is MSA, we use a default photo

  8.            if (photoStream == null)
  9.            {
  10.                var assembly = typeof(MailHelper).GetTypeInfo().Assembly;
  11.                photoStream = assembly.GetManifestResourceStream("XamarinConnect.test.jpg");
  12.            }

  13.            MemoryStream photoStreamMS = new MemoryStream();
  14.            // Copy stream to MemoryStream object so that it can be converted to byte array.
  15.            photoStream.CopyTo(photoStreamMS);

  16.            DriveItem photoFile = await UploadFileToOneDriveAsync(photoStreamMS.ToArray());

  17.            MessageAttachmentsCollectionPage attachments = new MessageAttachmentsCollectionPage();
  18.            attachments.Add(new FileAttachment
  19.            {
  20.                ODataType = "#microsoft.graph.fileAttachment",
  21.                ContentBytes = photoStreamMS.ToArray(),
  22.                ContentType = "image/png",
  23.                Name = "me.png"
  24.            });

  25.            // Get the sharing link and insert it into the message body.
  26.            Permission sharingLink = await GetSharingLinkAsync(photoFile.Id);
  27.            string bodyContentWithSharingLink = String.Format(bodyContent, sharingLink.Link.WebUrl);


  28.            // Prepare the recipient list
  29.            string[] splitter = { ";" };
  30.            var splitRecipientsString = recipients.Split(splitter, StringSplitOptions.RemoveEmptyEntries);
  31.            List<Recipient> recipientList = new List<Recipient>();

  32.            foreach (string recipient in splitRecipientsString)
  33.            {
  34.                recipientList.Add(new Recipient { EmailAddress = new EmailAddress { Address = recipient.Trim() } });
  35.            }

  36.            try
  37.            {
  38.                var graphClient = AuthenticationHelper.GetAuthenticatedClient();

  39.                var email = new Message
  40.                {
  41.                    Body = new ItemBody
  42.                    {
  43.                        Content = bodyContentWithSharingLink,
  44.                        ContentType = BodyType.Html,
  45.                    },
  46.                    Subject = subject,
  47.                    ToRecipients = recipientList,
  48.                    Attachments = attachments
  49.                };

  50.                try
  51.                {
  52.                    await graphClient.Me.SendMail(email, true).Request().PostAsync();
  53.                }
  54.                catch (ServiceException exception)
  55.                {
  56.                    throw new Exception("We could not send the message: " + exception.Error == null ? "No error message returned." : exception.Error.Message);
  57.                }


  58.            }

  59.            catch (Exception e)
  60.            {
  61.                throw new Exception("We could not send the message: " + e.Message);
  62.            }
  63.        }
Step 9: Run the Application:
  1. Select iOS,android and Windows project and run the application .
  2. Click on Connect Button from iOS/Android /Windows
  1. Sign in with your personal or work or school account and grant the requested permissions.

4. Click on Send mail button. When the mail is sent, a Success message is displayed.
This mail message includes the photo as an attachment and also provides a sharing link to the uploaded file in OneDrive. Check your mail from Inbox or Spam.

Download Source Code:
You can download the complete source code from MSDN sample. 

Summary:
In this article, you learned about how to implement login authentication and Send mail using Microsoft graph API in the Xamarin Forms application.

If you have any questions/ feedback/ issues, please write in the comment box.

Sunday, June 11, 2017

Xamarin Forms ChatBot Application using the Microsoft Bot Framework


Introduction:
The Bots Framework that run inside skype ,web chat , Facebook ,Message ,etc. Users can interact with bots by sending them messages, commands and inline requests. You control your bots using HTTPS requests to our bot API.
In this article, how you can integrate a bot right into your Xamarin.Forms application via the Microsoft Bot Framework Web bots.


Create new bot Application:
You can read my previous article for Getting Started with Bots Using Visual Studio 2017 from following URL http://www.c-sharpcorner.com/article/getting-started-with-bots-using-visual-studio-2017/
Bot Application
Publish Bot Application to Azure:
You can read my previous articles for publish bot application to azure from following URL http://www.c-sharpcorner.com/article/getting-started-deploy-a-bot-to-azure-using-visual-studio-2017/
Generate Web Chat Code:
After publish you bots into azure, you can generate web Chat html code from bots portal as per below
Step 1
Sign in to the Bot framework Portal - https://dev.botframework.com/
Step 2
Click My Bots
Step 3
Select your bot that you want to generate code
Step 4:
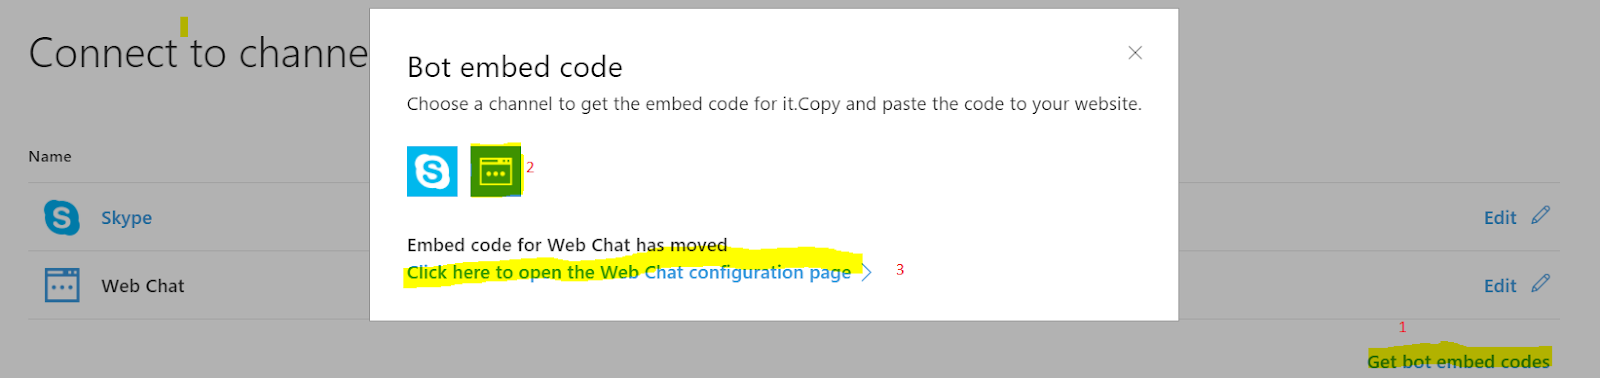
Click on Get bot embed Codes > Click on Web Chat icon > Click on (Click here to open Web Chat configuration page)
Step 5:
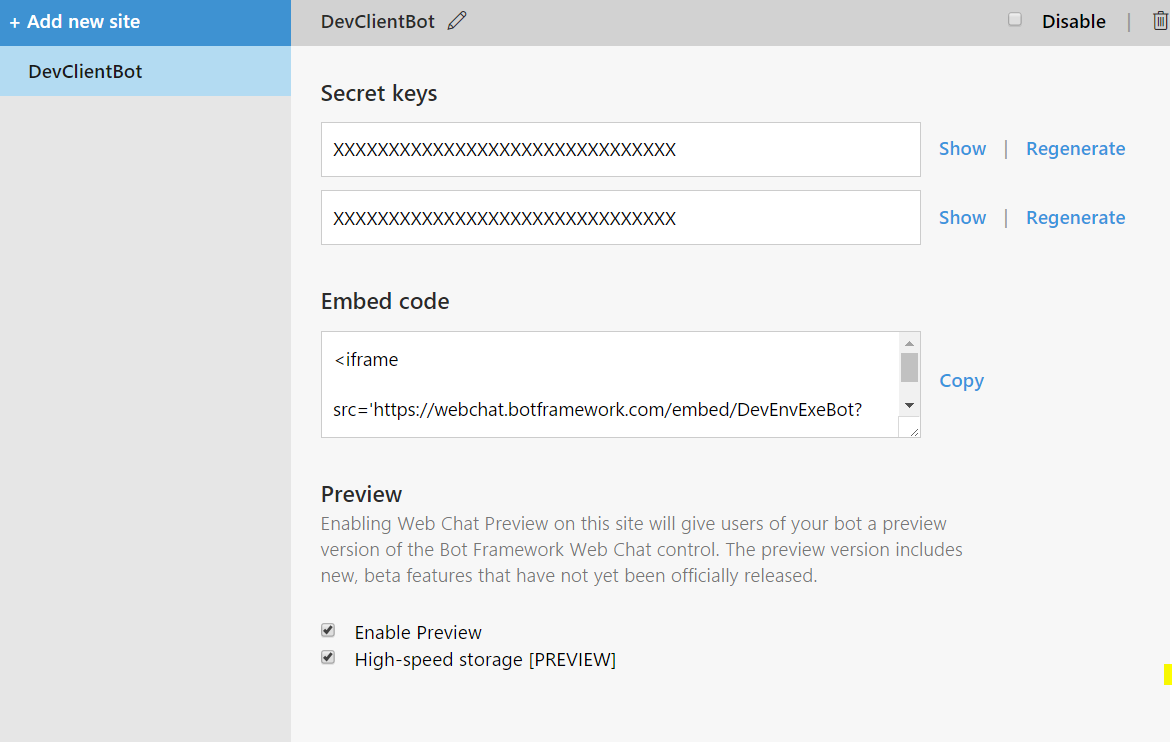
It will navigate to new web page for configuration and click on + Add New Site > Provide site or application name > Click on Done
Step 6:
You can copy your secret keys and embed code for integrate to xamarin forms application
Create new Xamarin .Forms Application :
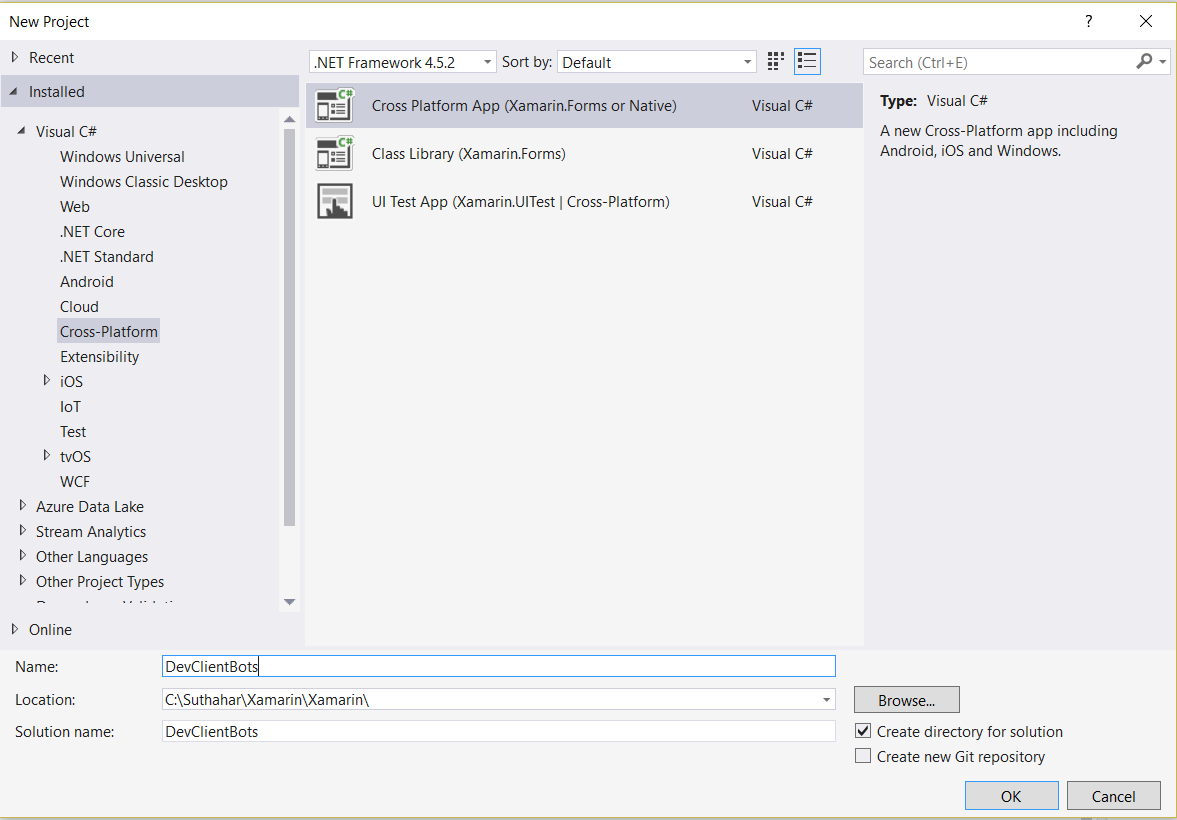
Go to Run (Windows key +R) > type Devenv.exe or select from Windows Application list and select New project from File menu > New Project (ctrl +Shift+N) or click More project template from VS Start screen.
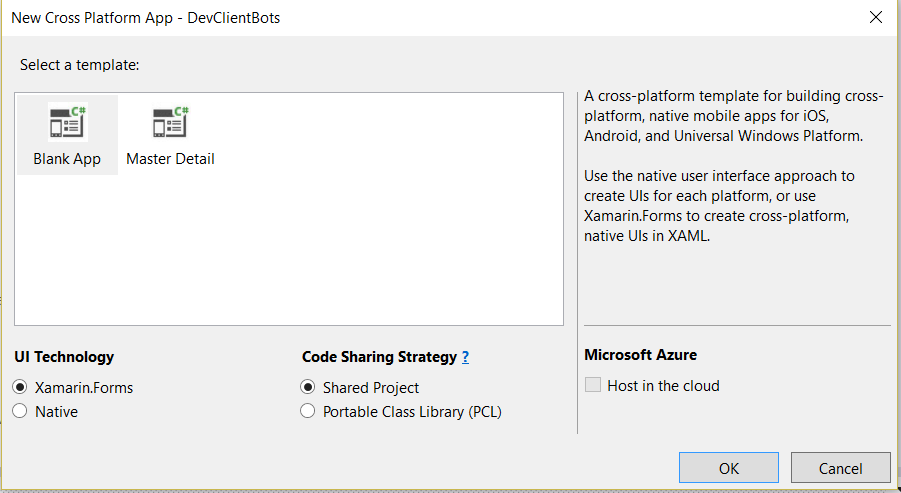
New Project >select Cross -Platform from Template > Cross platform App(Xamarin.Forms or native). It will show the screen, as shown below.
You can find above screen only on VS 2017. Select Blank apps > select Xamarin.Forms  > Select PCL and click on Ok .it will generate all the mobile platform project with PC
Open your MainPage.xaml file add webview control with following code for web chat enable
  1.   <StackLayout WidthRequest="300" HeightRequest="500" >
  2.        <Image Source="profile.png" WidthRequest="200" HeightRequest="200"></Image>
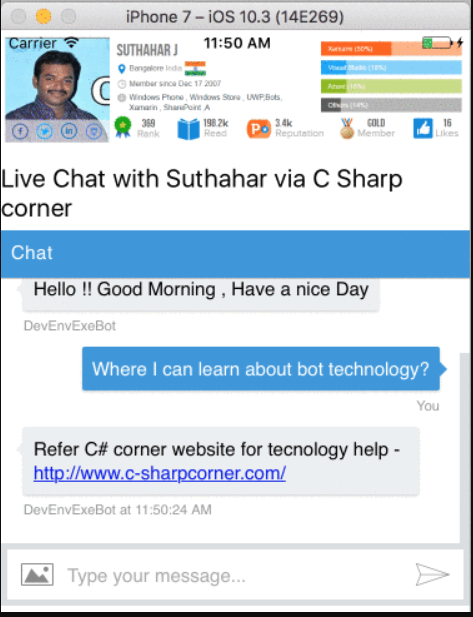
  3.        <Label Text="Live Chat with Suthahar via C Sharp corner" FontSize="20" ></Label>
  4.        <WebView x:Name="webview" Source="https://webchat.botframework.com/embed/DevEnvExeBot?s=8XGcUROXkAA.cwA.pZo.8pJ-6oQ3sJRpxq0tqIo9uLPji4oxBQuz2pW5qWobw2c"
  5.                 WidthRequest="300" HeightRequest=" 300"></WebView>
  6.    </StackLayout>
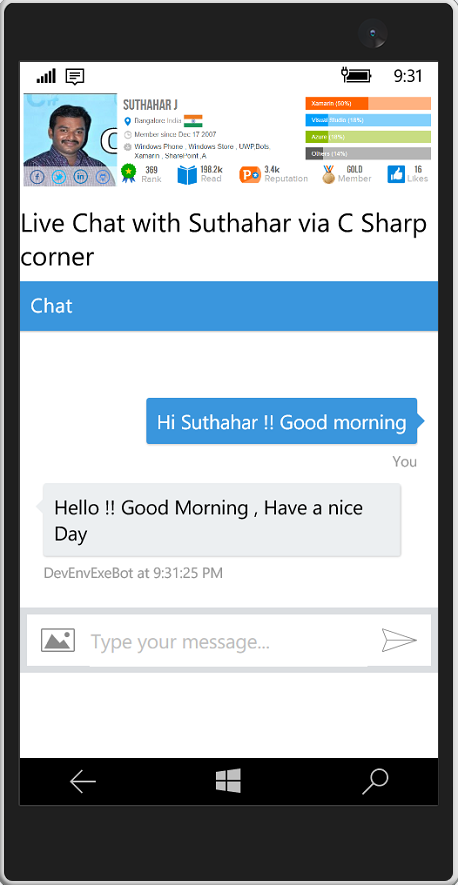
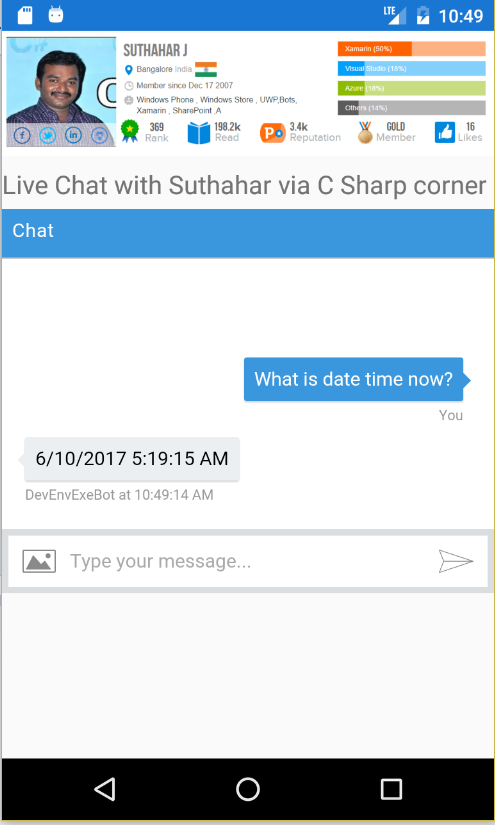
Now you can run the application in windows ,Android and iOS
 Download
You can download the complete source code from MSDN sample. 
Summary
In this article, your learned how to create a Bot application, publish Bot to Azure and bot implementation to Xamarin Forms using Visual Studio 2017. If you have any questions/ feedback/ issues, please write in the comment box.



Saturday, May 13, 2017

Microsoft Announces Xamarin Live Player on Visual Studio

Introduction:

Visual Studio 2017 was launched on March 7, 2017 with many fresh and exciting features for Visual Studio developers and Xamarin Live Player Announced on stage at Build 2017.
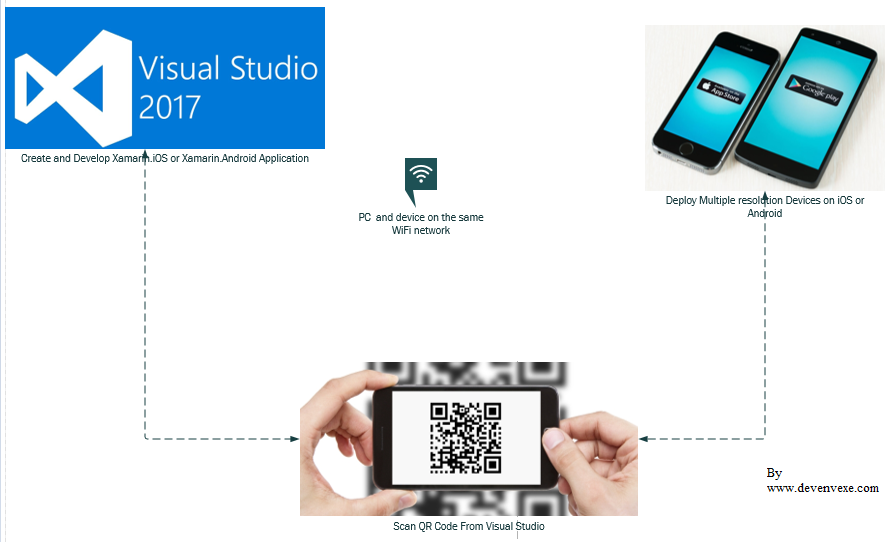
Developing iOS and Android apps on a Windows PC and run on Xamarin Live Player app no need to setup emulator or connect cable to deploy the code and You have the app running from Visual Studio, either with or without the debugger, you can enable “Live Run” mode, which will constantly deploy your code as you edit it.
Setup on Windows machine:

  1. Download and Install Visual Studio 2017 15.3 Preview or above from https://www.visualstudio.com/vs/preview/
  2. Connect PC and device on the same Wifi network
  3. Xamarin Live Player will support only on Visual Studio, does not work on xamarin studio
Setup on Mobile Device:
  1. Download and Install Xamarin Live Player on iOS device from https://itunes.apple.com/us/app/xamarin-live-player/id1228841832?ls=1&mt=8
  2. Download and Install Xamarin Live Player on Android Device from  https://play.google.com/store/apps/details?id=com.xamarin.live
Step 1: Create New Xamarin Forms Application:
Let's start with creating a new Xamarin project in Visual Studio.
Click on Windows Key > Select Visual Studio 2017 Preview


Step 2: Select New Template:
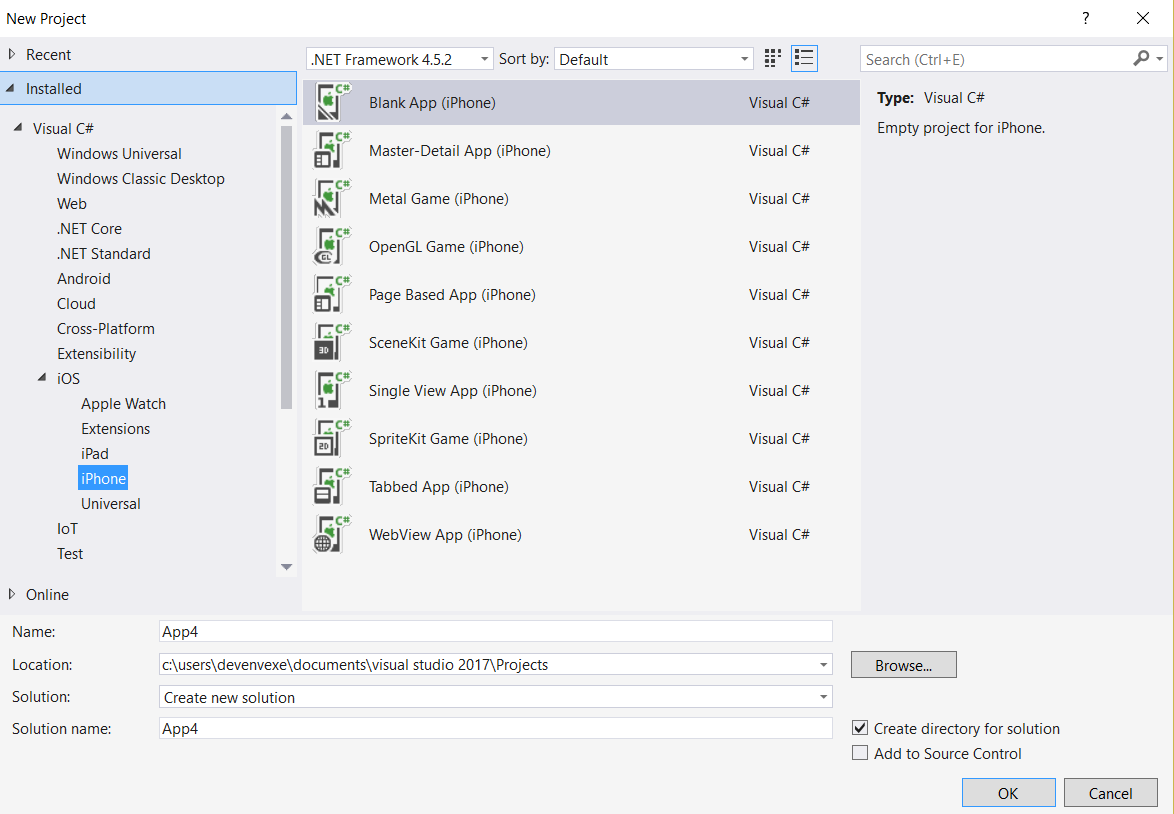
New Project (Ctrl+Shift+N) -> select Portable Blank Xaml app.
Step 3: Select Live Player:
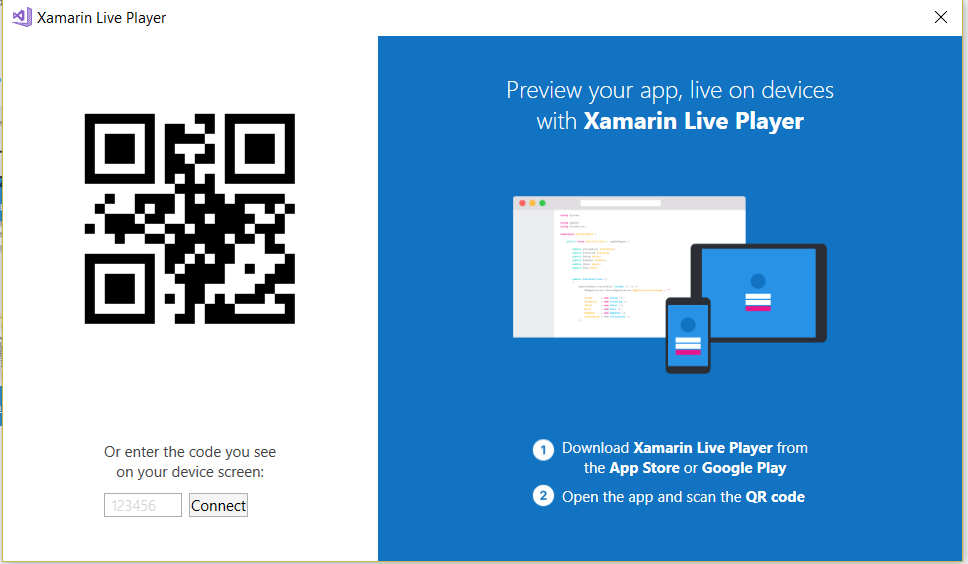
Choose live Player in the device list
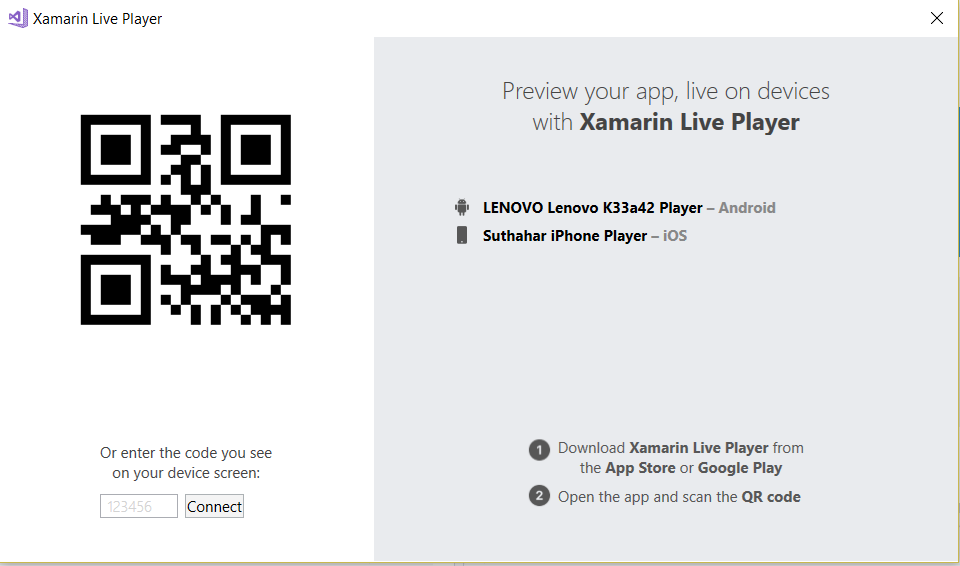
If you have already paired a device, it will be available as an option.

Otherwise you'll be prompted to pair a device when required. When you press Pair to Visual Studio, use the camera to scan the barcode showing on your computer or enter the code you see on your device on screen


You can click on Tools > Xamarin Live Player > Manage Devices

Step 4: Run and Debug Application:
Select your device and run the application.
Start Without Debugging – you can edit the app and see the changes occur on the device Start Debugging – you can set breakpoints and inspect variables, but code cannot be edited.
Issues and Resolutions:
I have shared some implementation, development issues and solution given below.
http://csharpcorner.mindcrackerinc.netdna-cdn.com/article/getting-started-with-google-and-bing-maps-using-xamarin-forms/Images/image014.jpg
  1. Mobile Device Does connect to PC ?
Solution:
  1. Make sure device and computer are on same network
  2. Restart Xamarin Live player app
  3. if Device connect with Cable, you disconnect and deploy the application
  1. No option to select Xamarin Live Player in the device list?

Solution:
    1. Ensure you are using Visual Studio 2017 15.3 Preview from https://www.visualstudio.com/vs/preview/
    2. Install the Xamarin Updater from:
https://marketplace.visualstudio.com/items?itemName=Xamarin.XamarinUpdater
    1. Update all the things in Extensions & Updates under Updates > Xamarin Preview which will download the available updates.
    2. Close Visual Studio, which auto-launches the installer for the downloaded updates.
    3. Relaunch Visual Studio after the installation finishes.
Summary:
This article you learned about Xamarin Live Player ,VS system requirement, install Visual studio preview 15.3 and issue and resolution.
If you have any question/ feedback/ issues, please write them in the comment box

Getting Started with Xamarin Application using Visual Studio for Mac

Introduction:

Visual Studio 2017 for mac was launched at MS Build 2017 with many fresh and exciting features for Visual Studio developers in mac machine. Mac OS user can build apps for mobile, web, and cloud with Xamarin and .NET Core, games with Unity using Visual Studio.
In this article, I will share how to create new Xamarin.Forms application using Visual studio for mac.

System Requirement:


Visual Studio 2017 for mac will install and run on the following operating system
  1. MacOS Sierra 10.12 or Mac OS X El Capitan 10.11
  2. Xcode 8.3 or above requires macOS Sierra 10.12,
  3. Xamarin.Android requires the 64-bit Java Development Kit (JDK)
  4. 1.8 GHz or faster processor with min 4GB RAM .

Install Visual Studio for mac:


Download Visual Studio 2017 for mac from https://www.visualstudio.com/vs/?os=mac .If you are downloading before May 17, you will get free 60-day access to Xamarin University.

Create New Xamarin.Forms Application:


Step 1: Launch VS from mac:
Launch Visual Studio for mac from Launchpad
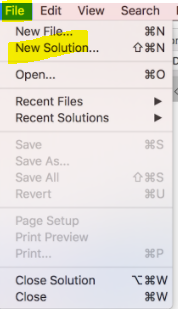
Step 2: Create New Solution :
Create New Solution (File >New Solution) or VS home screen > Click on New Project


Step 3: Choose a Template:
Visual Studio for mac will support to develop apps for Android, macOS, iOS, tvOS, watchOS, web, and cloud. Code fast and test. Here, I will select xamarin.Forms template under multiplatform .

Step 4: Multiplatform Xamarin.Forms Application:
The Multiplatform Xamarin.Forms App and the Native App project templates now provide you a quick way to create a multiplatform mobile app with cloud backend. This template will include Xamarin.iOS ,Xamairn.Android and share code with cloud service .
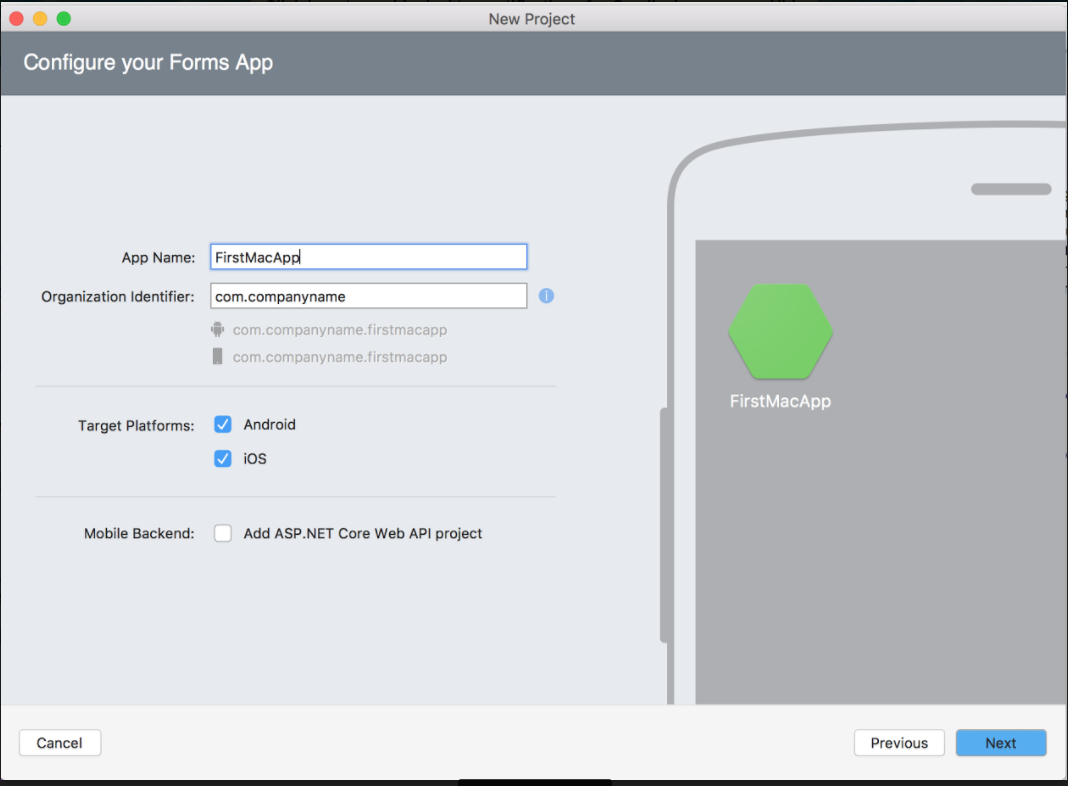
Provide App name. identifier, platform and mobile backend detail from following screen
Step 5: Configure Your Application:
Provide the project, solution name, local location and version control details from following screen  

Step 6: Solution successfully Created:
You can do Drag and Drop UI Design for iOS and android with Live preview and building, deployment, debugging the application.

Step 7: Run the Application:
Debug and Run the xamarin application
Summary:
This article you learned VS system requirement, install Visual studio from mac and how to create new xamarin application using Visual studio for mac.
If you have any question/ feedback/ issues, please write them in the comment box