Step 1:
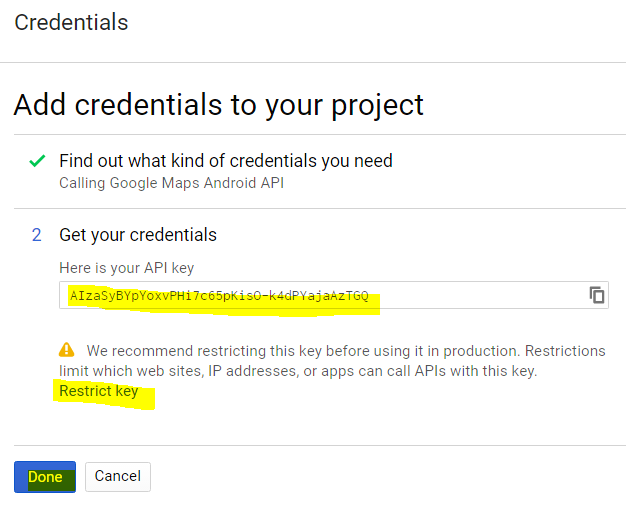
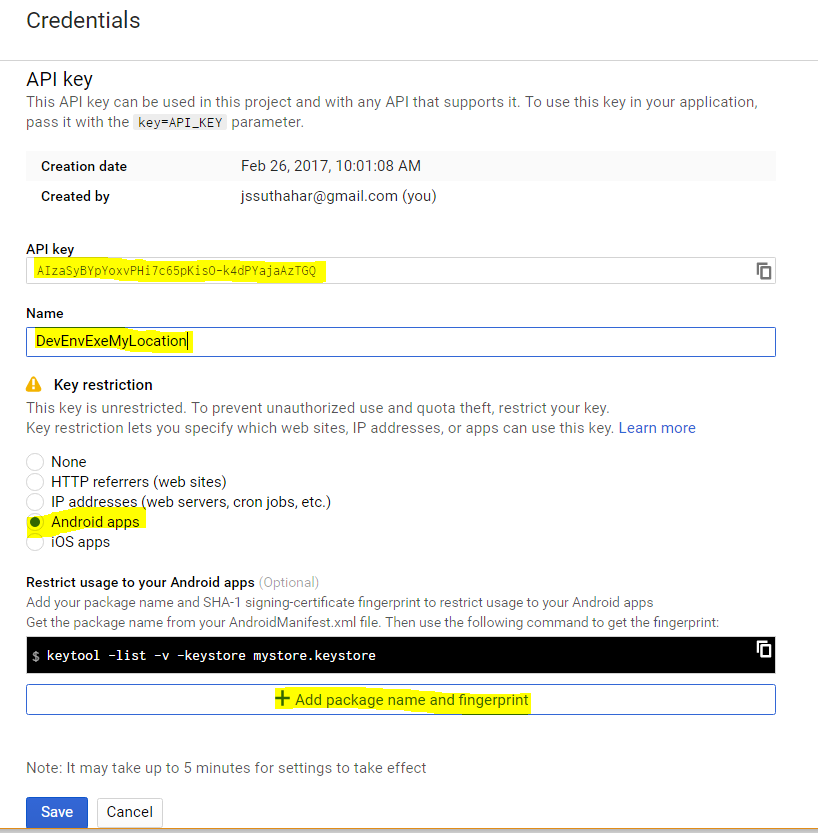
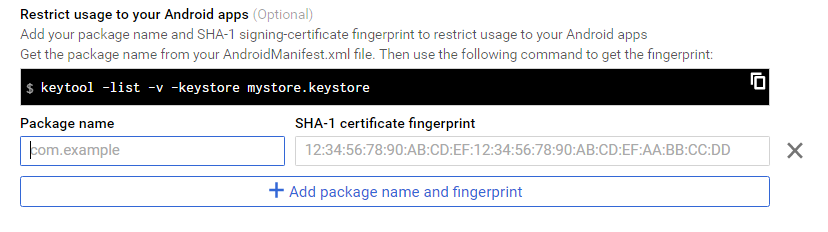
Create / Register Azure Active Directory Login from Here
Step 2:
Implement Xamarin.Forms Application
After completed your Azure app register, then you can start follow below steps for create xamarin application with Login AD Authentication.
Step 1: Create New Xamarin Forms Application:
Let Start create new Xamarin Forms Project in Visual studio. Open Run ➔ Type Devenev.Exe and enter ➔ New Project (Ctrl+Shift+N)➔ select Blank Xamarin.Forms Portable template
It will automatically create multiple project like Portable, Android, iOS, UWP. First we will start edit portable project then platform specific project
Step 2: Install Microsoft ActiveDirectory nuget Package
Microsoft ADAL provides a Xamarin Portable Class Library with easy to use authentication functionality for.NET client on various platforms including UWP, Xamarin iOS and Xamarin.Android .you can get more info from here ( https://www.nuget.org/packages/Microsoft.IdentityModel.Clients.ActiveDirectory/)
For implement Azure active directory login, we need to install Active Directory Authentication Library, I will show below steps for install ADAL library
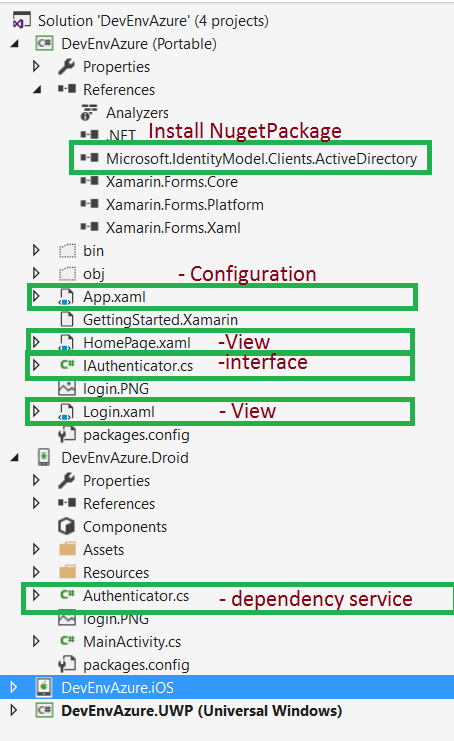
Select Solution => Right Click Manage nuget Packages for Solution => Search “Microsoft IdentityModel” => Select Microsoft.IdentityModel.Clients.ActiveDirectory => Select all Project => Click on Install
Step 3: Azure AD Configuration (App.xaml.cs)
I have added azure configuration like ApplicationID,tenantUrl,returnuri and GraphresourceUrI in APP.xaml.cs
In portable project =>open App.xaml.cs = > update all configuration
using Microsoft.IdentityModel.Clients.ActiveDirectory;
using System;
using System.Collections.Generic;
using System.Linq;
using System.Text;
using Xamarin.Forms;
namespace DevEnvAzure
{
public partial class App : Application
{
// update your Application ID or client ID
public static string ApplicationID = "----dfc6-2089-4e8c-ssss-8d3591736a96";
//modify your Azure tenant
public static string tenanturl = "https://login.microsoftonline.com/<Azure Tenant >
//Update your return url
public static string ReturnUri = "http://DevEnvAzure.microsoft.net";
//No need to change
public static string GraphResourceUri = "https://graph.microsoft.com";
public static AuthenticationResult AuthenticationResult = null;
public App()
{
InitializeComponent();
MainPage = new DevEnvAzure.Login();
}
protected override void OnStart()
{
// Handle when your app starts
}
protected override void OnSleep()
{
// Handle when your app sleeps
}
protected override void OnResume()
{
// Handle when your app resumes
}
}
}
|
Step 3: Create Login Page (Login.Xaml)
I have created quick and simple login screen. You can modify as per your requirement
Right Click Portable Class Library ➔ Add New Item ➔ Select Xaml Page(Login)
<?xml version="1.0" encoding="utf-8" ?>
<ContentPage xmlns="http://xamarin.com/schemas/2014/forms"
xmlns:x="http://schemas.microsoft.com/winfx/2009/xaml"
xmlns:local="clr-namespace:DevEnvAzure"
x:Class="DevEnvAzure.Login">
<StackLayout HorizontalOptions="Center" VerticalOptions="Center" Padding="10" Spacing="10">
<Button Text="" Clicked="Login_OnClicked" Image="login.png" />
</StackLayout>
</ContentPage>
|
Step 4: Login Click Event (Login.Xaml.cs)
Add LoginClick event in login page code behind file and if login success ,page navigate to home page
using Microsoft.IdentityModel.Clients.ActiveDirectory;
using System;
using Xamarin.Forms;
namespace DevEnvAzure
{
public partial class Login : ContentPage
{
public Login()
{
InitializeComponent();
}
private async void Login_OnClicked(object sender, EventArgs e)
{
try
{
var data = await DependencyService.Get<IAuthenticator>()
.Authenticate(App.tenanturl, App.GraphResourceUri, App.ApplicationID, App.ReturnUri);
App.AuthenticationResult = data;
NavigateTopage(data);
}
catch(Exception)
{ }
}
public async void NavigateTopage(AuthenticationResult data)
{
var userName = data.UserInfo.GivenName + " " + data.UserInfo.FamilyName;
await Navigation.PushModalAsync(new HomePage(userName));
}
}
}
|
Step 4: Create Home Page
I have created quick and simple home screen. You can modify as per your requirement
Right Click Portable Class Library ➔ Add New Item ➔ Select Xaml Page(Homepage)
<?xml version="1.0" encoding="utf-8" ?>
<ContentPage xmlns="http://xamarin.com/schemas/2014/forms"
xmlns:x="http://schemas.microsoft.com/winfx/2009/xaml"
x:Class="DevEnvAzure.HomePage">
<Label Text="" x:Name="lblname" VerticalOptions="Center" HorizontalOptions="Center" />
</ContentPage>
|
And modify code behind file like below
using Xamarin.Forms;
namespace DevEnvAzure
{
public partial class HomePage : ContentPage
{
public HomePage(string username)
{
InitializeComponent();
lblname.Text = " Welcome Mr " + username;
}
}
}
|
Step 5: Create Authentication Interface.
In portable project, Add a new interface for Authentication method. The authentication method will return Authentication result from ADAL , Which contains the AccessToken and user details .
Right Click on PCL project => Select Interface => name as IAuthenticator.cs => Click on Ok
using Microsoft.IdentityModel.Clients.ActiveDirectory;
using System.Threading.Tasks;
namespace DevEnvAzure
{
public interface IAuthenticator
{
Task<AuthenticationResult> Authenticate(string tenantUrl, string graphResourceUri, string ApplicationID, string returnUri);
}
}
|
Step 6: Implement Platform Specific Dependency Service:
We need to implement platform specific dependency services for login authentication .
The below code is Xamarin.Forms DependencyService which maps Authenticator.
[assembly: Dependency(typeof(DevEnvAzure.Droid.Authenticator))]
|
Android Application:
Add Authenicator clsss in xamarin Android application
Right click Android Project => Select Class=> Name as Authenticator
using Android.App;
using Microsoft.IdentityModel.Clients.ActiveDirectory;
using System;
using System.Linq;
using System.Threading.Tasks;
using Xamarin.Forms;
[assembly: Dependency(typeof(DevEnvAzure.Droid.Authenticator))]
namespace DevEnvAzure.Droid
{
class Authenticator : IAuthenticator
{
public async Task<AuthenticationResult> Authenticate(string tenantUrl, string graphResourceUri, string ApplicationID, string returnUri)
{
try
{
var authContext = new AuthenticationContext(tenantUrl);
if (authContext.TokenCache.ReadItems().Any())
authContext = new AuthenticationContext(authContext.TokenCache.ReadItems().FirstOrDefault().Authority);
var authResult = await authContext.AcquireTokenAsync(graphResourceUri, ApplicationID, new Uri(returnUri), new PlatformParameters((Activity)Forms.Context));
return authResult;
}
catch(Exception)
{
return null;
}
}
}
}
|
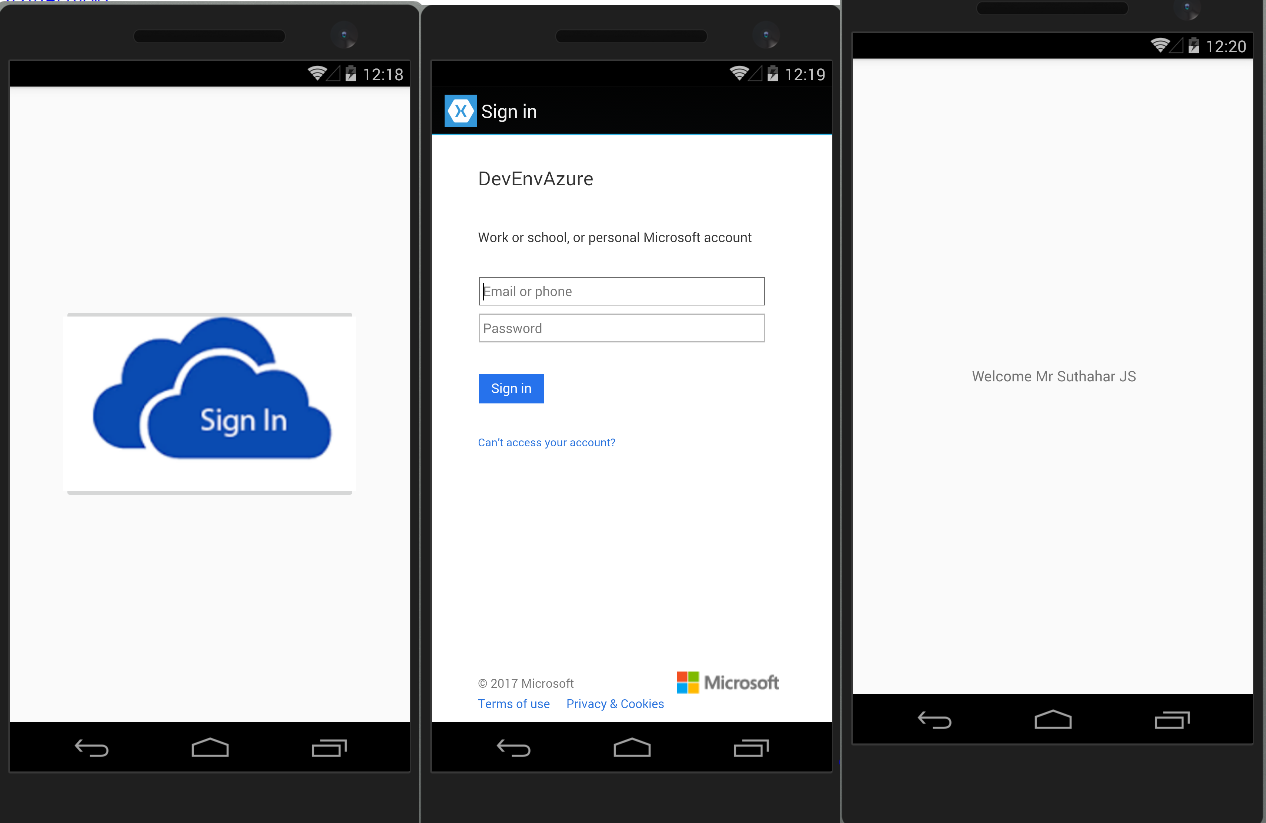
Now run your application and see the result like below
UWP Application:
Add Authenicator clsss in xamarin UWP application
Right click UWP Project => Select Class=> Name as Authenticator
using System;
using System.Collections.Generic;
using System.Linq;
using System.Text;
using System.Threading.Tasks;
using Microsoft.IdentityModel.Clients.ActiveDirectory;
using Xamarin.Forms;
[assembly: Dependency(typeof(DevEnvAzure.UWP.Authenticator))]
namespace DevEnvAzure.UWP
{
public class Authenticator : IAuthenticator
{
public async Task<AuthenticationResult> Authenticate(string tenantUrl, string graphResourceUri, string ApplicationID, string returnUri)
{
try
{
var authContext = new AuthenticationContext(tenantUrl);
if (authContext.TokenCache.ReadItems().Any())
authContext = new AuthenticationContext(authContext.TokenCache.ReadItems().First().Authority);
var authResult =
await
authContext.AcquireTokenAsync(graphResourceUri, ApplicationID, new Uri(returnUri),
new PlatformParameters(PromptBehavior.Auto, false));
return authResult;
}
catch(Exception )
{
return null;
}
}
}
}
|
Now run your application and see the result like below
iOS Application:
Add Authenicator clsss in xamarin iOS application
Right click iOS Project => Select Class=> Name as Authenticator
using System;
using System.Linq;
using Microsoft.IdentityModel.Clients.ActiveDirectory;
using UIKit;
using Xamarin.Forms;
using System.Threading.Tasks;
[assembly: Dependency(typeof(DevEnvAzure.iOS.Authenticator))]
namespace DevEnvAzure.iOS
{
class Authenticator : IAuthenticator
{
public async Task<AuthenticationResult> Authenticate(string tenantUrl, string graphResourceUri, string ApplicationID, string returnUri)
{
try
{
var authContext = new AuthenticationContext(tenantUrl);
if (authContext.TokenCache.ReadItems().Any())
authContext = new AuthenticationContext(authContext.TokenCache.ReadItems().FirstOrDefault().Authority);
var authResult = await authContext.AcquireTokenAsync(graphResourceUri, ApplicationID, new Uri(returnUri),
new PlatformParameters(UIApplication.SharedApplication.KeyWindow.RootViewController));
return authResult;
}
catch (Exception)
{
return null;
}
}
}
}
|
Now run your application and see the result like below
Issues and Solution:
I have shared below some implementation, Development, issues and solution
Error: Could not Install Package Microsoft.IdentityModel.Client.ActiveDirectory
While trying adding Nuget package for Azure Active Directory ('Microsoft.IdentityModel.Clients.ActiveDirectory 3.13.8') , it is possible you will receive an error complaining that the package does not contain any assembly references which are compatible with the targets of your PCL project. The error will be something like below.
Error:
Could not install package 'Microsoft.IdentityModel.Clients.ActiveDirectory 3.13.8'. You are trying to install this package into a project that targets '.NETPortable,Version=v4.5,Profile=Profile259', but the package does not contain any assembly references or content files that are compatible with that framework. For more information, contact the package author.
Solution:
ADAL does not support windows phone 8.1 version so we need to follow below steps for resolve above shown issue
Remove Installed all Nuget package
Removing the windows Phone 8.1 project from solution
Remove target platform from the PCL project
Step 1: Remove Installed all Nuget package
Go To solution > Right Click > Manage Nuget Packages > Click on Installed tab > uninstall all installed package like (Including Xamarin.Form etc ) .
If you are not uninstall the package and trying to change the targeted platforms by removing the target Windows Phone 8.1 you would get an error.
Step 2: Remove the Windows 8.1 project from Solution
ADAL does not support Windows Phone 8.1 so you need remove windows 8.1 project from solution . Only removing the Windows Phone 8.1. project from your solution will not resolve this issue. You still need follow next steps as well
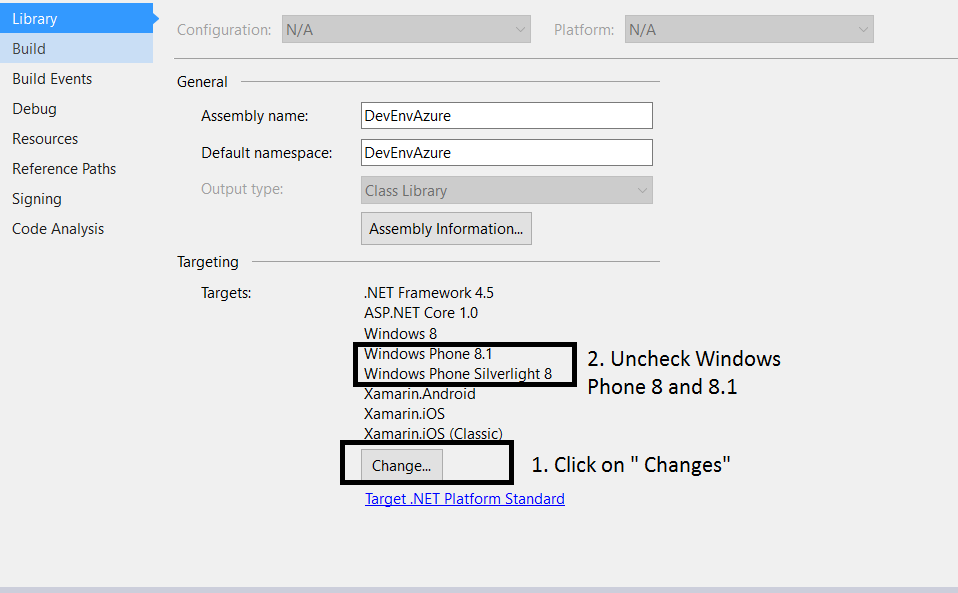
Step 3: Remove target platform from the PCL project
Right click on your PCL project > Click on “Properties” > Go to the tab “Library” > You can see list of targeted platforms > Press the button “Change” > uncheck the target “Windows Phone 8.1” and “ Windows Phone Silvelight 8” > Press the “OK” button
Wait a few seconds and the dialog will be gone and the target is removed from the PCL project.
Now you can able to install ADAL nuget package from your solution
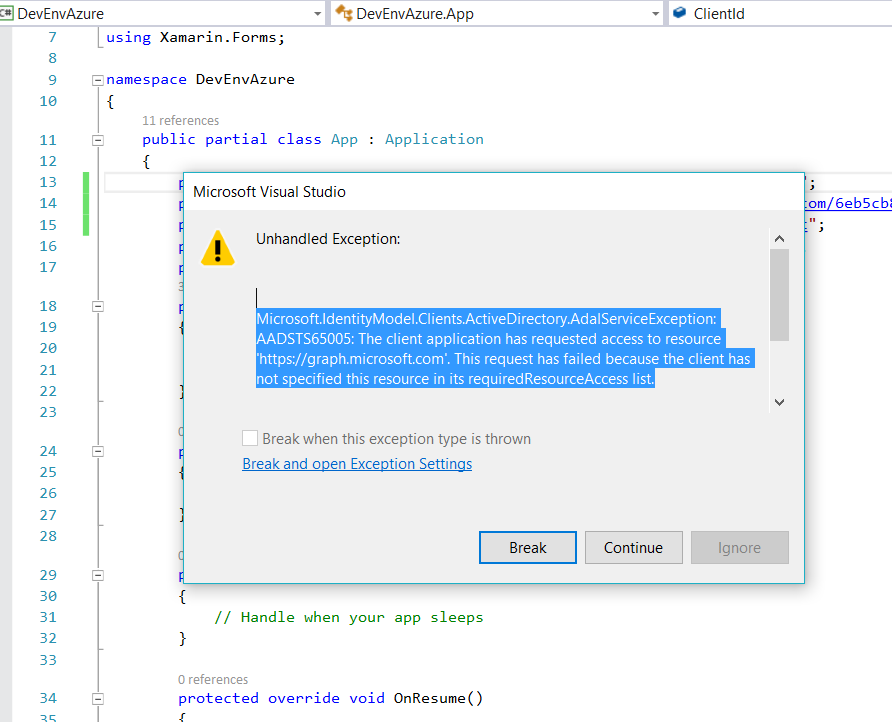
Error:
Micrsoft.identityModel.Clients.ActiveDirectory.AdalServiceException:AADSTS65005:The Client application has requested access to resource ‘https://graph.microsoft.com’.the request has failed because theclient has not specific this resource in its requredResourceAccss list. If you get above error means ,try below solution
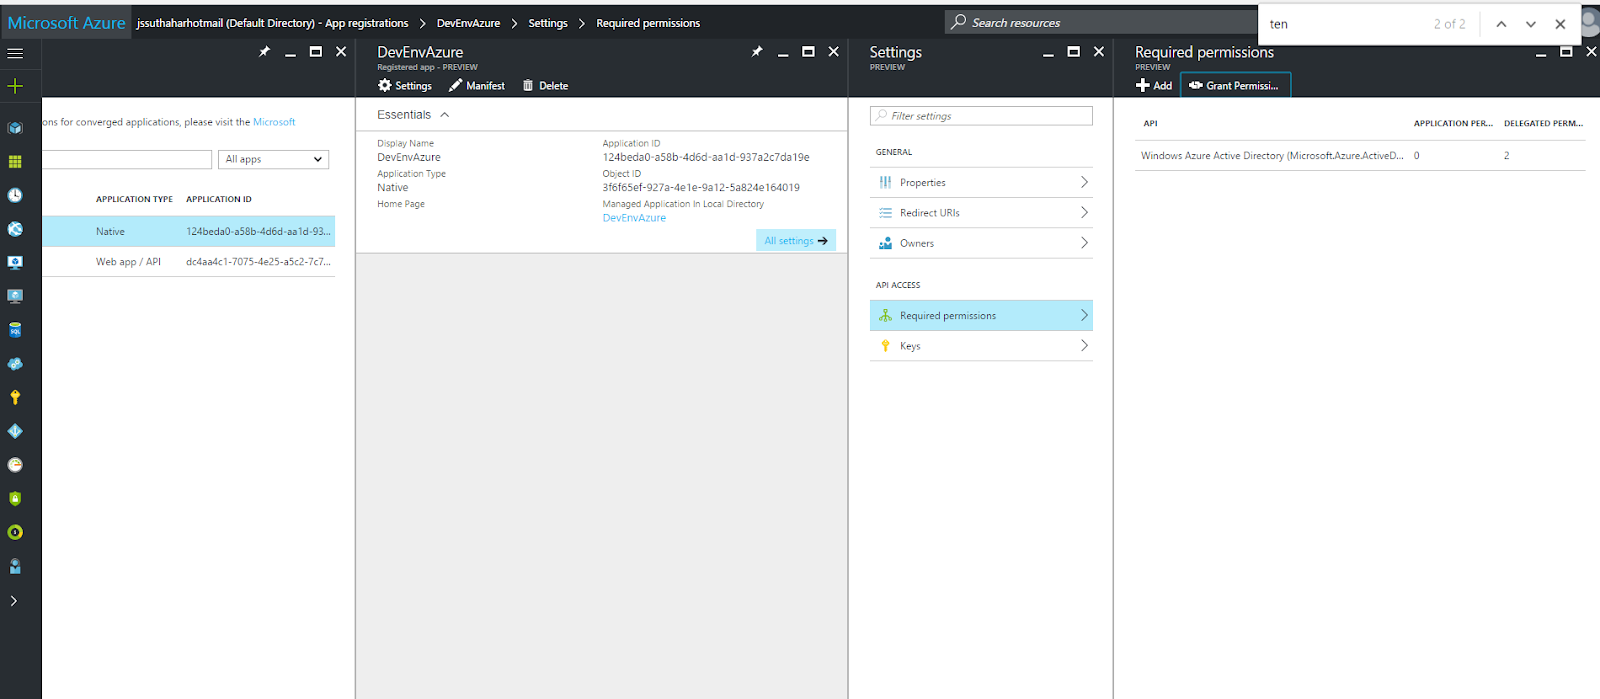
Solution:
You are missed to give Grand permission to your application so We need to give permission to access application from mobile or web so follow below steps for grand permission. Select on newly created application => Select on Required Permission => Click on Grand permission.
Related Article:
-
-
-