Search

Drop Down MenusCSS Drop Down MenuPure CSS Dropdown Menu

Saturday, April 22, 2017

Value Converter in Xamarin.Forms

Introduction:
Databind two control properties or view model property that have incompatible types / Validation, you need a piece of code in between, that converts the value from source to target type and back. This piece of code is called ValueConverter. A value converter is a class, that implements the interface IValueConverter with the two methods object Convert(object value) and object ConvertBack(object value).
In this article, I will share about IValueConverter in xamarin.forms application
Create New Xamarin Forms Application:
Let's start with creating a new Xamarin Forms Project in Visual Studio.

Open Run - Type Devenev.Exe and enter - New Project (Ctrl+Shift+N) - select Blank Xaml App (Xamarin.Forms Portable) template.
You can refer my previous article for create new xamarin forms application from here - http://www.c-sharpcorner.com/article/how-to-create-first-xamarin-form-application/
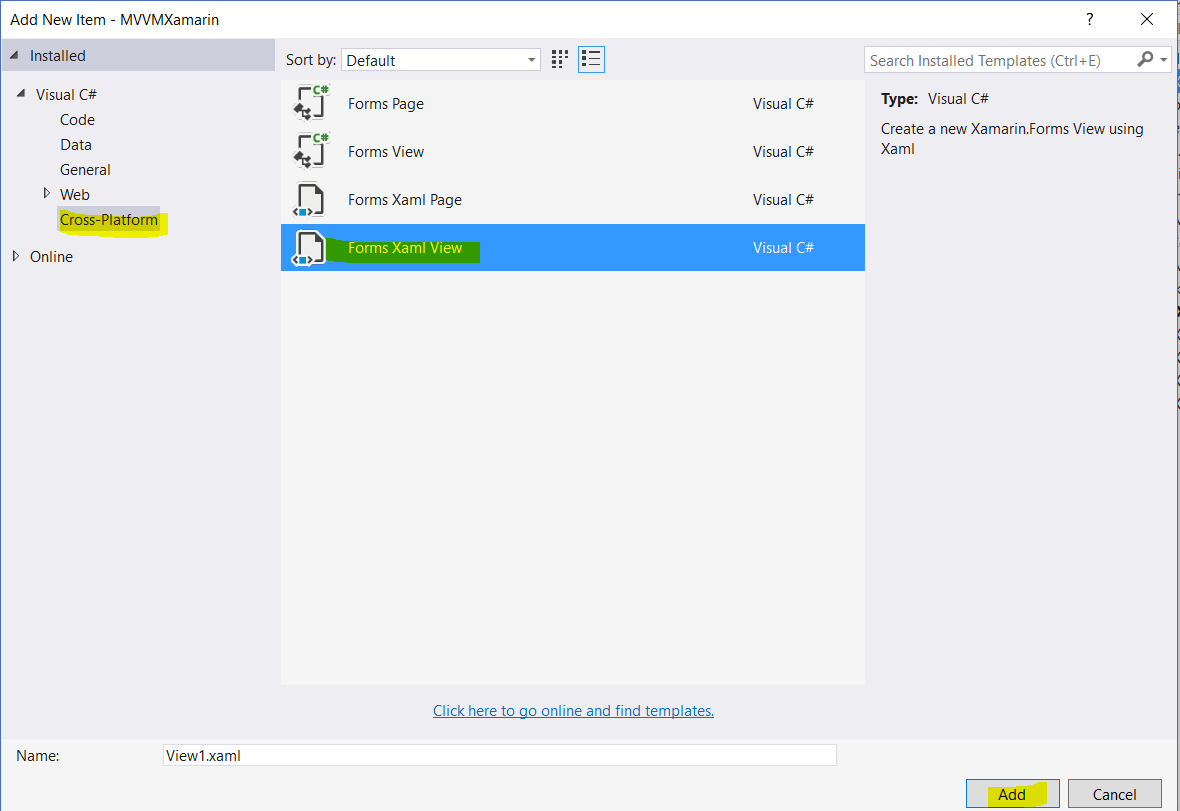
Create New Value Convert Class:
You can create new Value Converter class now, Right Click Project > Add New Item > Add Class File, Name as “ MaxLengthConverter” .
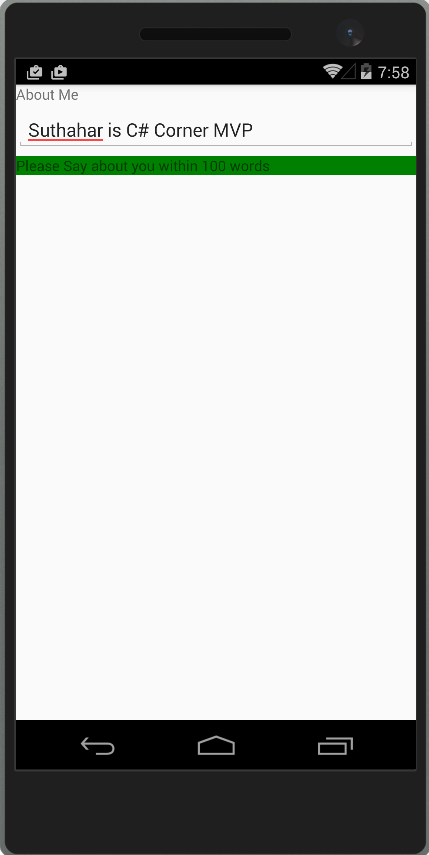
In the following sample, I am getting value from Editor control and checking text length ,if text length less than 100 words  means label color changed green or Red color .
Inherit IvalueConverter interface and add xamarin.Forms name space .
  1. using System;
  2. using System.Globalization;
  3. using Xamarin.Forms;
  4. namespace MVVMXamarin
  5. {
  6.    class MaxLengthColorConverter : IValueConverter
  7.    {
  8.        public object Convert(object value, Type targetType, object parameter, CultureInfo culture)
  9.        {
  10.            if (value != null)
  11.            {
  12.                int count = value.ToString().Length;
  13.                if (count > 100)
  14.                {
  15.                    return Color.Red;
  16.                }
  17.            }
  18.            return Color.Green;
  19.        }
  20.        public object ConvertBack(object value, Type targetType, object parameter, CultureInfo culture)
  21.        {
  22.            throw new NotImplementedException();
  23.        }
  24.    }
  25. }


Implement Value Convert in Xaml:
In the following xaml page, added converter class within Resource Dictionary and added convert class key from control
  1. <?xml version="1.0" encoding="utf-8" ?>
  2. <ContentPage xmlns="http://xamarin.com/schemas/2014/forms"
      1. xmlns:x="http://schemas.microsoft.com/winfx/2009/xaml"
      2. x:Class="MVVMXamarin.ConvertDemo"
  3. xmlns:local="clr-namespace:MVVMXamarin;assembly=MVVMXamarin">
  4. <ContentPage.Resources>
  5. <ResourceDictionary>
  6. <local:MaxLengthColorConverter x:Key="cnmaxlength"></local:MaxLengthColorConverter>
  7. </ResourceDictionary>
  8. </ContentPage.Resources>
  9. <StackLayout>
  10. <Label Text="About You"></Label>
  11. <Editor  x:Name ="txtname"></Editor>
  12. <Label BindingContext="{x:Reference Name=txtname}" Text="Please Say about you within 100 words" BackgroundColor="{Binding Path=Text,Converter={StaticResource cnmaxlength}}"
      1. VerticalOptions="Center"
      2. HorizontalOptions="Center" />
  13. </StackLayout>
  14. </ContentPage>
Implement value Converter in C#:
In the following sample code shown, how add converter class into c# binding control .You can add your converter class into Setbinding method.
  1. StackLayout layout = new StackLayout();
  2. Label lbltitle = new Label();
  3. lbltitle.Text = "About Me";
  4. layout.Children.Add(lbltitle);
  5. var editor = new Editor();
  6. layout.Children.Add(editor);
  7. var label = new Label();
  8. label.Text = "Please Say about you within 100 words";
  9. label.SetBinding(Label.BackgroundColorProperty, new Binding("BackgroundColor",mode:BindingMode.Default, source: editor,converter: new MaxLengthColorConverter(),stringFormat:null));
  10. layout.Children.Add(label);
  11. this.Content = layout;

I believe this article will help you for how to use IValueConverter  

Download Source code :


Monday, April 17, 2017

Binding Control to Control in Xamarin Forms

Introduction:

Databinding is a mechanism in Xamarin Forms Application.  Binding is common context, is the process of mapping a property on a Page, to a property in a view or ViewModel. In this Article I will show how bind Control property to Control property  binding in xamarin Forms.
 
Create New Xamarin. Forms Application:
Let's start with creating a new Xamarin Forms Project in Visual Studio.

Open Run - Type Devenev.Exe and enter - New Project (Ctrl+Shift+N) - select Blank Xaml App (Xamarin.Forms Portable) template.
You can refer my previous article for create new xamarin forms application from here - http://www.c-sharpcorner.com/article/how-to-create-first-xamarin-form-application/

Binding Control to Control using xaml :
Data bindings can be defined to link properties of two Controls on the same page. In this case, you set the BindingContext of the target object using the x: Reference markup extension.
In the following sample added one Entry control and Label control for print text
  1. <StackLayout>
  2.  <Entry x:Name ="txtname"></Entry>
  3.  <Label  Text="Welcome Mr.."
  4.           VerticalOptions="Center"
  5.           HorizontalOptions="Center" />
  6.  <Label BindingContext="{x:Reference Name=txtname}" Text="{Binding Path=Text}"
  7.           VerticalOptions="Center"
  8.           HorizontalOptions="Center" />
  9.  </StackLayout>
Entry Control Name : txtname
Label control adding Binding Context and Binding the value.
While assign binding Context, we can use following two way
BindingContext="{x:Reference Name=txtname} OR BindingContext="{x:Reference txtname} // Name attribute is not required
Same like while assign value to property, we can use following two way
Text="{Binding Path=Text}" OR Text="{Binding Text}" // Path attribute is not required

Binding Control with String Builder:
All the database data or other srorage data is not formatted data so you Can bind Property with string or any type like below  
<Label BindingContext="{x:Reference Name=txtname}" Text="{Binding Path=Text, StringFormat='Welcome Mr {0}'}"/>
  1. <StackLayout>
  2. <Entry x:Name ="txtname"></Entry>
  3. <Label BindingContext="{x:Reference Name=txtname}" Text="{Binding Path=Text, StringFormat='Welcome Mr {0}'}"
      1. VerticalOptions="Center"
      2. HorizontalOptions="Center" />
  4. </StackLayout>
Binding Control in C#:
You can do it effectively the same way as the XAML example simply by setting your view's BindingContext or Source to the other view.
label.SetBinding(Label.TextProperty, new Binding("<Property Name>", stringFormat: "Welcome Mr {0}", source: <BindingContext Control  name>));
or
var label = new Label{ BindingContext = <Control Name> };
label.SetBinding(Label.TextProperty, new Binding("<Property Name>", stringFormat: "Welcome Mr {0}"));
  1. StackLayout layout = new StackLayout();
  2. var editor = new Editor();
  3. layout.Children.Add(editor);
  4. var label = new Label();
  5. label.SetBinding(Label.TextProperty, new Binding("Text", stringFormat: "Welcome Mr {0}", source: editor));
  6. layout.Children.Add(label);
  7. this.Content = layout;
Binding User Control:
Xamarin Forms doesn’t have a control called a User Control. However, we can make any VisualElement, or combination of Visual Element’s into a reusable control, to use on different pages, just like a User Control.
Create User Control:
Right Click PCL project > Select” Forms XAML View”  and click on Add

In xaml and C# file, change content View to any layout control like Grid, Stack layout

In Xaml Page:
  1. <?xml version="1.0" encoding="UTF-8"?>
  2. <Grid xmlns="http://xamarin.com/schemas/2014/forms" xmlns:x="http://schemas.microsoft.com/winfx/2009/xaml" x:Class="MVVMXamarin.MyControl">
  3.    <Label Text="{Binding Text, Source={x:Reference this}}" />
  4.  
  5. </Grid>
In Code behind file, you might want to make your control, have a bindable property to pass data through to it, on each page it is used. First, create a Bindable Property in your UserControl. It doesn’t have to be bindable if you just want to pass a static value through, however if you want to bind to it, you must make it bindable.
  1. using System;
  2. using System.Collections.Generic;
  3. using System.Linq;
  4. using System.Text;
  5. using System.Threading.Tasks;
  6. using Xamarin.Forms;
  7. namespace MVVMXamarin
  8. {
  9.    public partial class MyControl : Grid
  10.    {
  11.        public MyControl()
  12.        {
  13.            InitializeComponent();
  14.        }
  15.        public static readonly BindableProperty TextProperty = BindableProperty.Create(nameof(Text), typeof(string), typeof(MyControl));
  16.        public string Text
  17.        {
  18.            get
  19.            {
  20.                return (string)GetValue(TextProperty);
  21.            }
  22.            set
  23.            {
  24.                SetValue(TextProperty, value);
  25.            }
  26.        }
  27.    }
  28. }
Going to your MainPage, you can now assign a value to the Text property. You can also use {Binding PropertyName} if you want, as this is a bindable property.
  1. <StackLayout>
  2. <Entry x:Name ="txtname"></Entry>
  3. <local:MyControl BindingContext="{x:Reference Name=txtname}" Text="{Binding Path=Text, StringFormat='Welcome Mr {0}'}">
  4. </local:MyControl>
  5.  </StackLayout>