Search

Drop Down MenusCSS Drop Down MenuPure CSS Dropdown Menu

Saturday, July 30, 2016

Getting Started – Xamarin.Forms


Introduction:
Xamarin.Forms is a cross platform UI toolkit that allow user to efficiently create native user interface layout. Code can be shared all the device (IOS,Android , Windows Phone and Win store app) .
System Requirement:
  1. Mac / Windows 7++ Machine with 8 GB RAM
  2. Xamarin  Studio 5.0 or new version/ Visual Studio 2012 or new version
Support Devices:
Xamarin.Forms applications can be support following operating systems devices
  • Android 4.0.3 (API 15) or higher
  • iOS 6.1 or higher
  • Windows Phone 8.1
  • Windows 8.1
  • Windows 10 Universal Apps
  • Windows Phone 8 Silverlight
                                 
How to create First Xamarin.Form Application?
Step 1:
Open Visual Studio ( Run ➔ Devenv.exe)
  • My system having following VS  version with xamarin

Step 2:
Create New Project ( File ➔ New ➔ Project )


Step 3:
Open New Project template Cross Platform ➔ Blank App(Xamarin .Forms .Portable)
*** Solution and project name is  DevXamarinForms

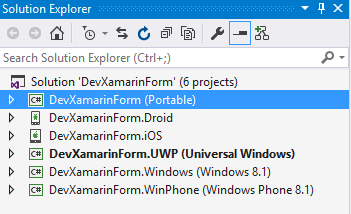
Visual Studio automatically creates following projects,
DevXamarinForms.Android, DevXamarinForms.iOS, DevXamarinForms.UWP, etc and a shared Portable Class Library (PCL) project named called DevXamarinForms (Refer below)
After create project solution should be like below
Step 4:
Right Click on Portable Project (DevXamarinForms) ➔ Add ➔ New Item ➔Cross-Platform ➔ Forms Xaml Page and name it HomePage.CS
After that two new file are created under portable library HomePage.XAML and HomePage.XAML.cs
In  HomePage.XAMl , the below code will automatically added into xaml page
<?xml version="1.0" encoding="utf-8" ?>
<ContentPage xmlns="http://xamarin.com/schemas/2014/forms"
            xmlns:x="http://schemas.microsoft.com/winfx/2009/xaml"
            x:Class="DevXamarinForms.HomePage">
<Entry x:Name="txtresult" Text="welcome Devenvexe.com" />  <!--Add this TextBox-->
</ContentPage>

The xml two name space (xmls) are added into xaml page and refered xamarin and micrsoft url with version.
The HomePage.xaml.cs code-behind file looks like this.
using Xamarin.Forms;

namespace DevXamarinForms
{
   public partial class HomePage : ContentPage
   {
       public HomePage()
       {
           InitializeComponent();
       }
   }
}

Where Can find InitializeComponent() Method :
InitializeComponent() method will generate during build so build your portable library ,  C# code file is generated from the XAML file. If you look in the \DevXamarinForms\DevXamarinForms\obj\Debug directory, you’ll find a file named DevXamarinForms.HomePage.xaml.g.cs. The ‘g’ stands for generated.

namespace DevXamarinForm {
using System;
using Xamarin.Forms;
using Xamarin.Forms.Xaml;
public partial class HomePage : global::Xamarin.Forms.ContentPage {
[System.CodeDom.Compiler.GeneratedCodeAttribute("Xamarin.Forms.Build.
Tasks.XamlG", "0.0.0.0")]
private global::Xamarin.Forms.Entry txtresult;
[System.CodeDom.Compiler.GeneratedCodeAttribute("Xamarin.Forms.Build.
Tasks.XamlG", "0.0.0.0")]
       private void InitializeComponent() {
           this.LoadFromXaml(typeof(HomePage));
           txtresult = this.FindByName<global::Xamarin.Forms.Entry>("txtresult");
       }
   }
}

Just Modify App.CS file, like below
using System;
using System.Collections.Generic;
using System.Linq;
using System.Text;

using Xamarin.Forms;

namespace DevXamarinForm
{
   public class App : Application
   {
       public App()
       {
           // The root page of your application
           //MainPage = new ContentPage
           //{
           //    Content = new StackLayout
           //    {
           //        VerticalOptions = LayoutOptions.Center,
           //        Children = {
           //            new Label {
           //                HorizontalTextAlignment = TextAlignment.Center,
           //                Text = "Welcome to Xamarin Forms!"
           //            }
           //        }
           //    }
           //};
           MainPage = new HomePage(); // Add this code
       }

   }
}

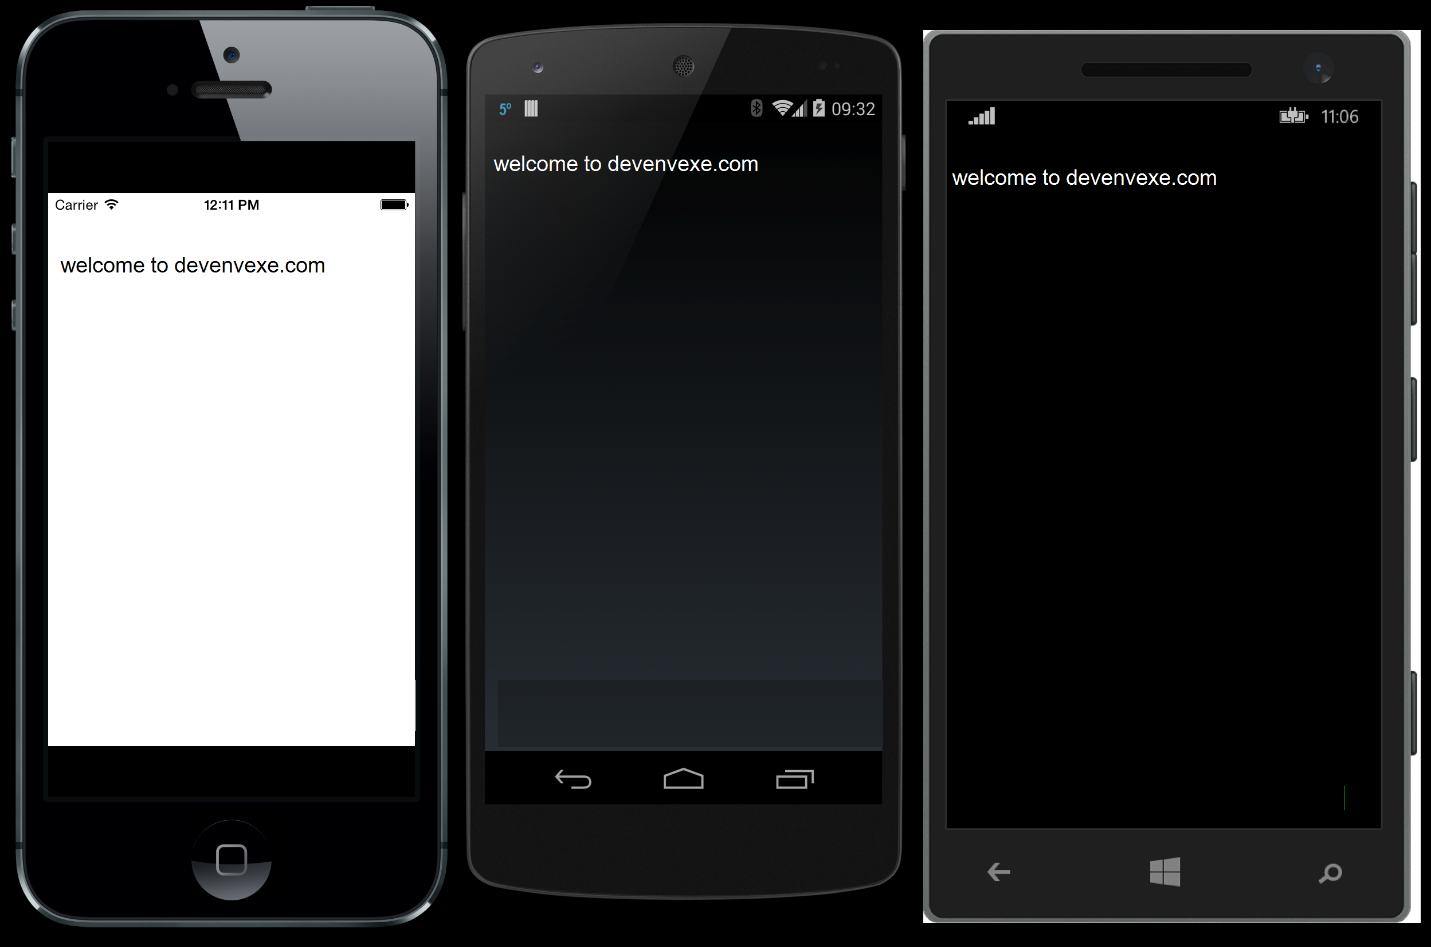
Build and Run Application:


Monday, July 18, 2016

Displaying List Data in Xamarin.Android and Visual Studio


Introduction

Let we look regarding list view binding. The cross-platform applications with Xamarin.iOS, Xamarin.Android the ListView control binding is structurally similar.

Xamarin.IOS
UITableViewSource 
Xamarin.Android
BaseAdapter

Your need follow Below steps for customizing a list view appearance


Step 1: Layout:

We need to create layout with List View controls.

HelloApp (ProjectName) è Resources  è layout (Right Click) è Add New Item è Select ( Android layout )  è Click Add

File Name: ListDemo.axaml  and drag drop List View control into layout page

<?xml version="1.0" encoding="utf-8"?>
<LinearLayout xmlns:android="http://schemas.android.com/apk/res/android"
    android:orientation="vertical"
    android:layout_width="match_parent"
    android:layout_height="match_parent"
    android:minWidth="25px"
    android:minHeight="25px">
    <ListView
        android:minWidth="25px"
        android:minHeight="25px"
        android:layout_width="match_parent"
        android:layout_height="match_parent"
        android:id="@+id/UserList" />
</LinearLayout>

****ListView Control name : UserList

Step 2: Model :

Create Model and add whatever property is required.

Model Name: User
Namespace :HelloApp.Model

namespace HelloApp.Model
{
    public class User
    {
     
        public string UName;
     
    }
}

Step 3: Adapter

Create adapter class and derived from BaseAdapter .
BaseAdapter is abstract class. we need implement following methods. We need select Row template and

namespace HelloApp.Adapters
{
    class UserAdapters : BaseAdapter<User>
    {
        List<User> userlist;
        Activity useractivity;
        public UserAdapters(Activity context ,List<User> item):base()
        {
            useractivity = context;
            userlist = item;
        }
        public override User this[int position]
        {
            get
            {
                throw new NotImplementedException();
            }
        }

        public override int Count
        {
            get
            {
                return userlist.Count;
            }
        }

        public override long GetItemId(int position)
        {
            return position;
        }

        public override View GetView(int position, View convertView, 
              ViewGroup parent)
        {
            var item = userlist[position];
            if(convertView == null)
            {
                convertView = useractivity.LayoutInflater.Inflate(Android.Resource.Layout.
SimpleExpandableListItem1,null);
              

            }
            convertView.FindViewById<TextView>(Android.Resource.Id.Text1).Text = item.uname;
            return convertView;

        }
    }
}

Step 4: Activity

HelloApp (ProjectName) (Right Click) è Add New Item è Select ( Activity)  è Click Add

Source Code :

namespace HelloApp
{
    [Activity(Label = "ListDemoActivity" , MainLauncher = true)]
    public class ListDemoActivity : Activity
    {
        private ListView UserListView;
        private List<User> userlist;
        protected override void OnCreate(Bundle savedInstanceState)
        {
            base.OnCreate(savedInstanceState);

            base.SetContentView(Resource.Layout.ListDemo);
            UserListView = FindViewById<ListView>(Resource.Id.UserList);
            userlist = new List<User>();
            userlist.Add(new User { UName = "Sutahahr" });

            userlist.Add(new User { UName = "Suresh" });
            userlist.Add(new User { UName = "Sumathi" });
            userlist.Add(new User { UName = "Sujatha" });
            UserListView.Adapter = new UserAdapters(this, userlist);


        }
    }
  
}

Source code explanation:

1.  [Activity(Label = "ListDemoActivity (Title Of Text)" , MainLauncher = true(Initial launcher))]

2.  private ListView UserListView – Find Control and assign to local variable

3.  private List<User> userlist;   - Assign Collection value

4.  base.SetContentView(Resource.Layout.ListDemo); - Assign layout content in activity

5.  UserListView = FindViewById<ListView>(Resource.Id.UserList); - Find user control from layout page

6.  userlist = new List<User>(); - add collection

7.  UserListView.Adapter = new UserAdapters(this, userlist); - Assign user collection into adapters


Tuesday, July 12, 2016

VS 2015 can launch the VS emulator but can't deploy the app.

Microsoft Visual Studio 2015 includes an Android emulator that you can use as a target for debugging your Xamarin.Android app .This emulator uses the Hyper-V capabilities of your development computer same like Windows phone .
Here we have found one issue in VS Emulator : VS 2015 can launch the VS emulator but can't deploy the app.
-          I have create blank xamarin android project without add any code when I debug this project debugging without problem but when I run app with visual studio emulator for android is running but not starting my app .
Solution :
   I was able to solve the issue like below
1.       Run Xamarin.Android app using VS and select VS Emulator.
2.       Launch the emulator
3.       Cancel deployment ( Build => Cancel Build)
4.       Click on the chevron icon in the toolbar to the right of the emulator
5.       Select the Network tab
6.       Locate the preferred network ip address
7.       Back to Visual Studio , click on the Open Adb Command Prompt toolbar button
8.       Type adb connect [the emulator ip address]


9.     Run application again it will start work .


*


*


***Adb -Android Debug Bridge

Thursday, June 30, 2016

MSDN Subscriptions with Free Xamarin Licensing

At the Build 2016 conference, Microsoft introduced the exciting news that Xamarin will now be available for all existing MSDN users at no extra cost.

Windows Developer:

 Xamarin is included in Visual Studio. Now you can develop mobile cross application using windows machine.

Mac Developer:

MSDN subscription users can download Xamarin Studio for Mac machine, no need to pay any payment.

Step 1:


Step 2:


Click on Register and Download 


Step 3:

Click checkbox on “I Agree “& Click on “Subscribe” button


Step 4:

Now you can develop mobile cross application. Free Licensing will allow only one machine at a time.

If you want to use different machine, you want to disable previous machine licensing like below

     Step 4.1:

           Login to Xamarin.com

     Step 4.2:


        Step 4.3:

               Click on Deactivate and Enable different machine .


Tuesday, September 30, 2014

How to load UIImage from web URL ?


How to load UIImage from web URL ?

UIImage img=Images.Fromuri("www.google.com/my.jpg");

Common Class :

public static Class Images
{
Public static UIImage FromUrl (string uri)
{
    using (var url = new NSUrl (uri))
    using (var data = NSData.FromUrl (url))
        return UIImage.LoadFromData (data);
}
}

How to choose a photo From Phone album?

In Xamarin.iOS Application for choose a photo from album .we need to use UIImagePickerController

Follow below step for show photo album Controller

1.  Create the image picker control
Var Imagepicker=new UIImagePickerController();

2.    Set the Source and media Type

Imagepicker.SourceType = UIImagePickerControllerSourceType.PhotoLibrary;
Imagepicker.MediaTypes = UIImagePickerController.AvailableMediaTypes (UIImagePickerControllerSourceType.PhotoLibrary);

3.Create Delegate event for image chose & cancel image selection.
Imagepicker.FinishedPickingMedia += Handle_FinishedPickingMedia;
Imagepicker.Canceled += Handle_Canceled;

4.Show Image controller

 NavigationController.PresentModalViewController(Imagepicker, true);

5.  Implement Image choose event

protected void Handle_FinishedPickingMedia (object sender, UIImagePickerMediaPickedEventArgs e)
{
    // determine what was selected, video or image
    bool isImage = false;
    switch(e.Info[UIImagePickerController.MediaType].ToString()) {
        case "public.image":
        // get the original image
        UIImage originalImage = e.Info[UIImagePickerController.OriginalImage] as UIImage;
        if(originalImage != null) {
            // do something with the image
            Console.WriteLine ("got the original image");
            imageView.Image = originalImage; // display
            break;
        case "public.video":
            Console.WriteLine("Video selected");
            break;
    }

    // dismiss the picker
    imagePicker.DismissModalViewControllerAnimated (true);
}

     6 .Cancel Image controller

void Handle_Canceled (object sender, EventArgs e) {
       Imagepicker.DismissModalViewControllerAnimated(true);

}

3. Which controller we can use for Phone photo album access?

UIImagePickerController

Thursday, September 4, 2014

How to Check compiled .exe or .dll assemblies to scan platform Specific code ?


In xamarin Scan  providing online support for our library how much platform Specific .we need to follow 3 steps, after that we will get know how much % it will support

Select compiled .NET libraries or executable (.exe or .dll files) and the scanner will identify platform-specific dependencies in your code, as well as provide suggestions for how you can make your code mobile-ready.

click below link for scan your executable file

                                               http://scan.xamarin.com/