Search

Drop Down MenusCSS Drop Down MenuPure CSS Dropdown Menu

Sunday, March 12, 2017

Microsoft Launches Visual Studio 2017 with Xamarin

Introduction:
Visual Studio 2017 successfully was launched on march 7 2017 with many fresh and exciting features for Visual Studio developers. On February 24, 2016 Xamarin and Microsoft announced that Microsoft signed a definitive agreement to acquire Xamarin . Microsoft Build 2016 announced that they will open-source the Xamarin SDK and that they will bundle it as a free tool within Visual Studio's integrated development environment.
Now We are celebrating our Visual Studio 20th anniversary and one year anniversary and release Visual studio 2017 with many features.
In this article, I will share Visual studio 2017 Xamarin project template, Cloud Storage template, Xamarin Forms preview.
Download and Install Visual Studio 2017:
Download Visual Studio 2017 from following url by March 14 and get free 60-day access to Xamarin University.
  1. Refer Visual Studio 2017 System requirement from here
Create New Xamarin Project:
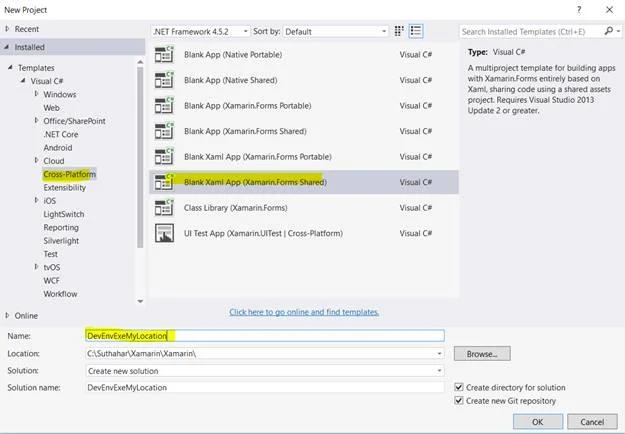
After successfully install Visual studio 2017, Go to Run (Windows key +R) > type Devenv.exe or Select from windows application list and Select New project from File menu > New Project (ctrl +Shift+N) or Click on more project template from VS Start screen
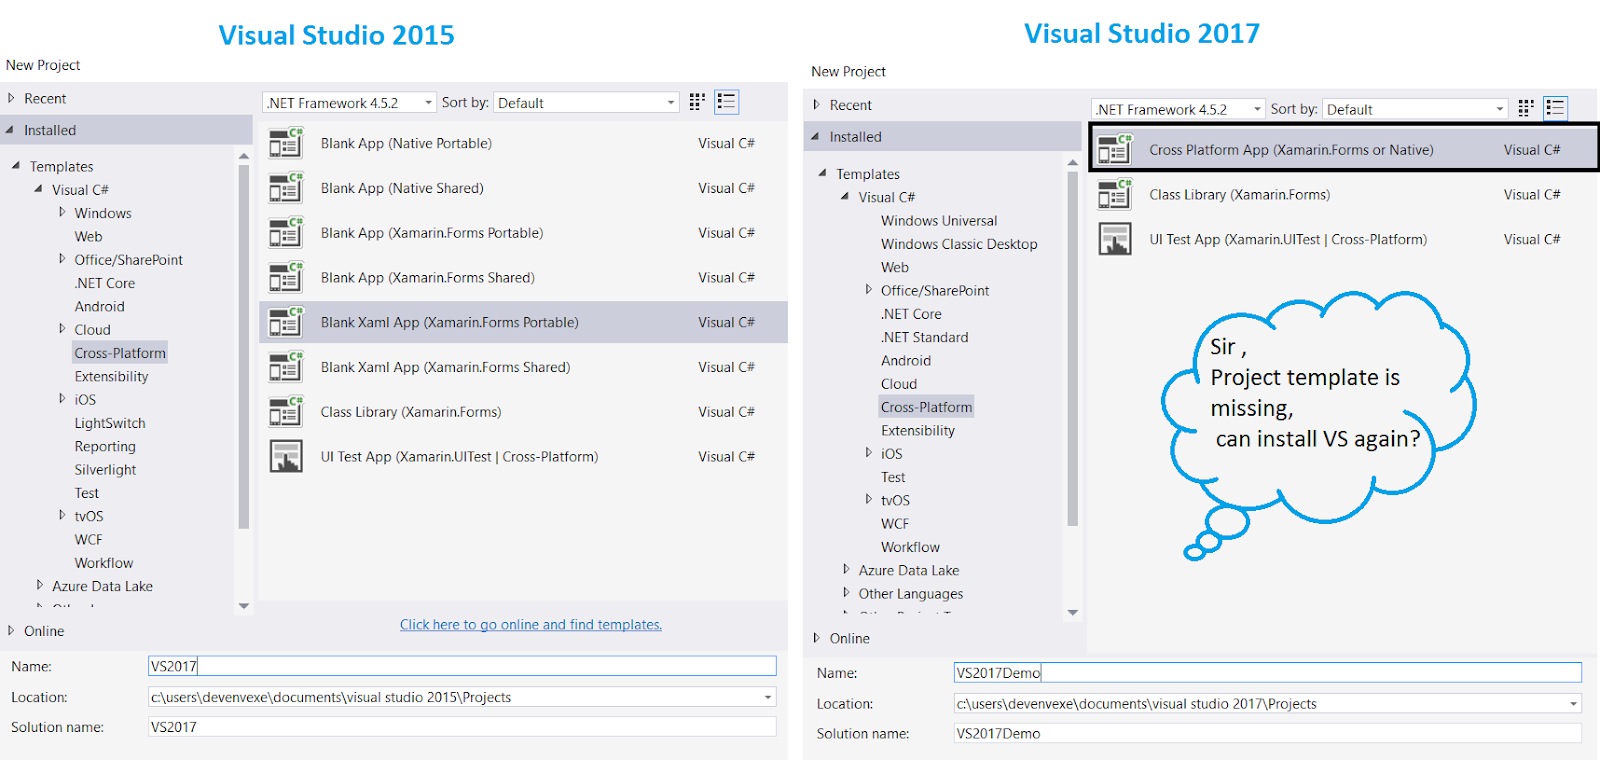
Visual Studio 2017 have different project template so no worry for new project window have only 3 project template. You can follow below steps for create new xamarin forms application using VS 2017
New Project >Select Cross -Platform from Template > Cross platform App(Xamarin.Forms or native) .it will show following screen
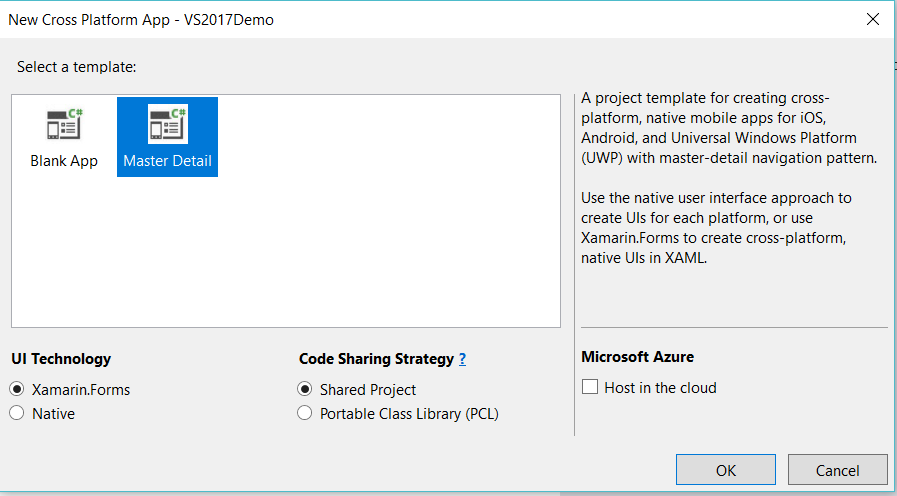
The Xamarin.Forms UI Template, Project template for creating cross platform, native mobile apps for iOS,Android ,UWP  and Select Blank UI or master detail menu using xamarin Forms  UI .
The Native UI, native user interface approach to create UI for each platform.
The Host in the cloud, Cross mobile application automatically integrated with azure cloud storage and create new project for cloud
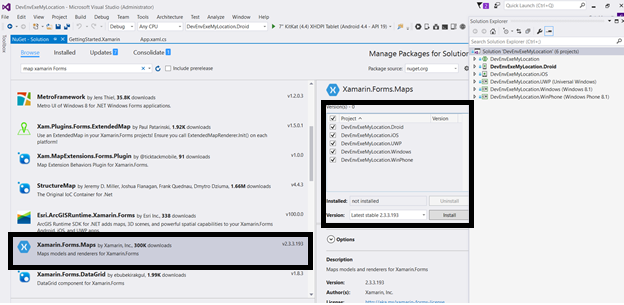
Xamarin.Forms Previewer:
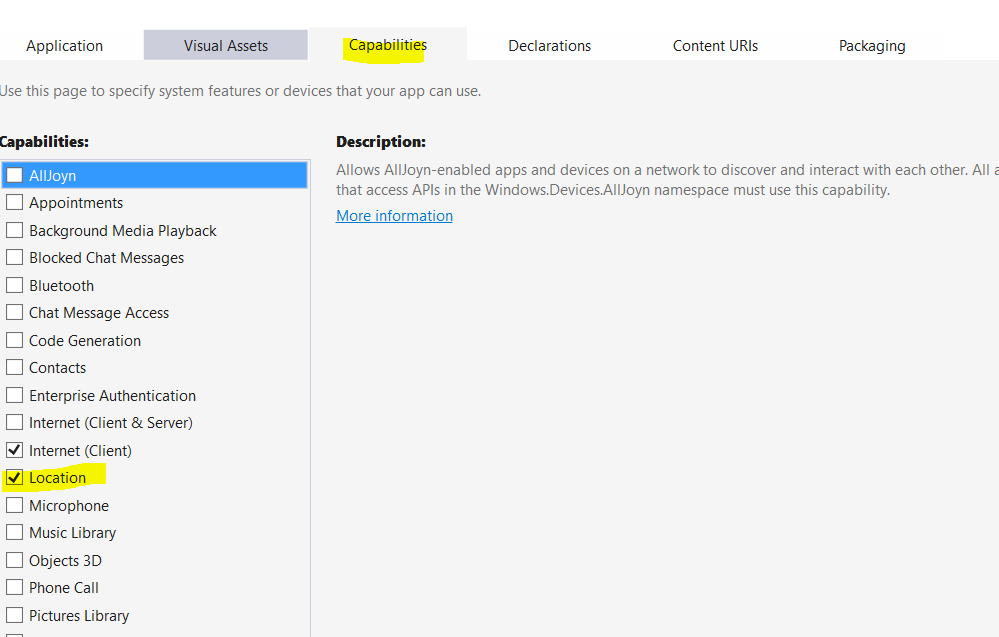
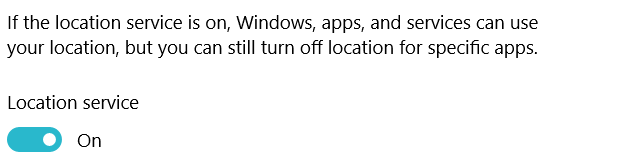
Microsoft and Xamarin team made many enhancements to the xamarin.Forms Previewer from Visual Studio 2017 . You can preview cross mobile application while design xaml based application.
Create New Blank / Master details xamarin form application and open Forms Preview window and activate follow below steps
Step 1: VS 2017 > click on View > Select Other Windows > Select Forms Preview
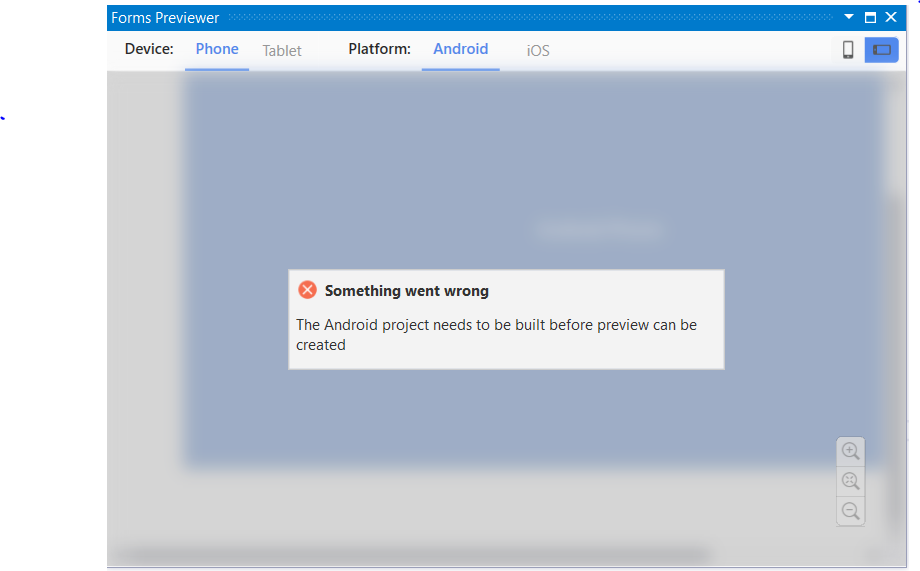
Step 2: The project preview needs to be built before preview the application
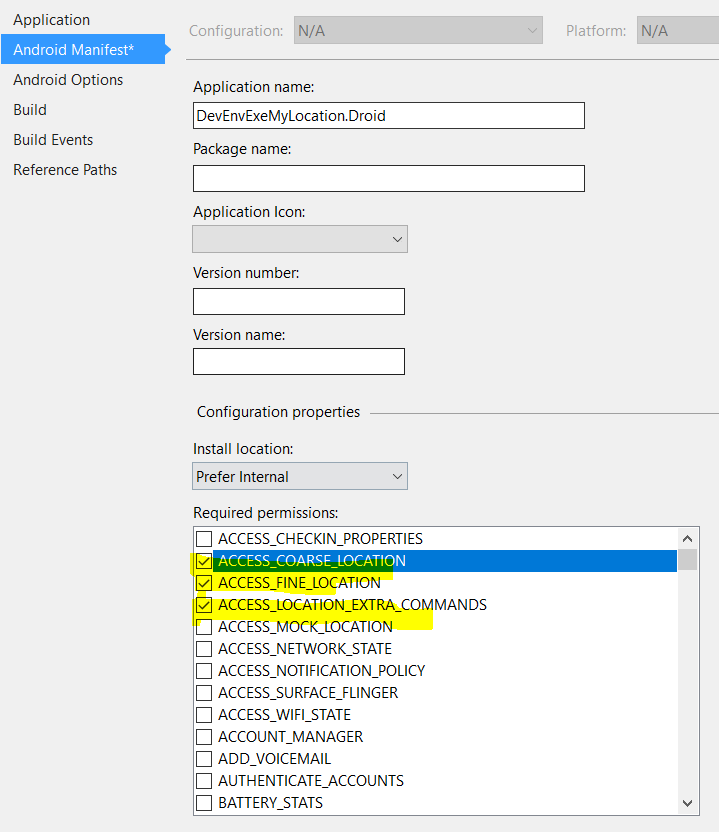
Step 3: Android Application preview, be sure that you have the latest Java 1.8 x64 installed from here
Step 4: install java 1.8 x64 and change to Android JDK path from Visual studio
             Goto Tools  Menu> Select Options > Xamarin> Android Setting > change Java Development kit                         location
Step 5: The iOS renderer required an active connection to your mac agent for preview .
Step 6: If you are getting any issue while connecting mac, please make sure xamarin version is same from both machine
Step 7: If you get error like this, this version of Xamarin.iOS requires the iOS 10.2 SDK (shipped with Xcode 8.2) when the managed linker is disabled Either upgrade Xcode, or enable the managed linker. two way we can resolve this issue.
    • It appears you have not updated Xcode. Check on your Mac and update xcode.
    • Another option would be to choose to 'Link Framework SDKs only'  right Click on iOS Project > Property > iOS Build > General tab>Linker Behavior > Link Framework SDKs only
Step8: If your facing any other issue, try closing and re-opening the XAML file and it will get resolve
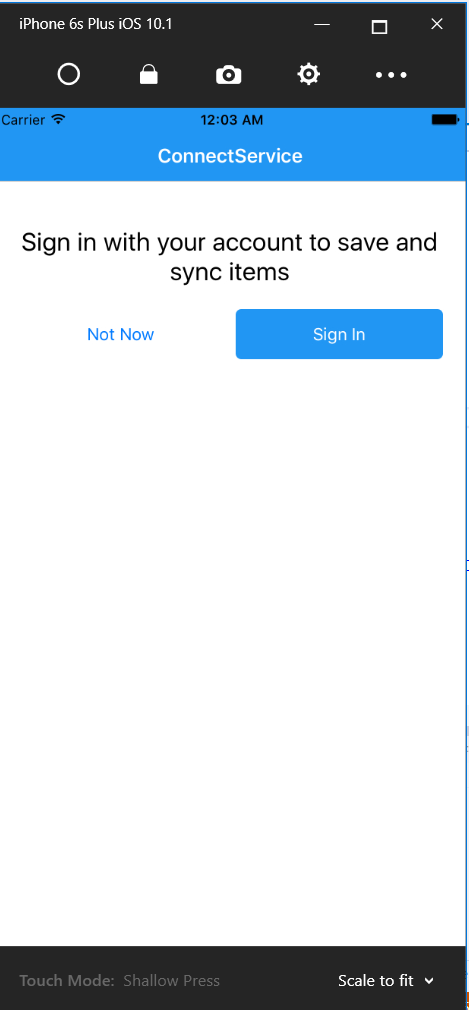

Host in the cloud:
VS 2017 introduced new cloud xamarin template with online and offline storage. Just follow below few steps for create cloud storage app with iOS, Android, and Windows 10 platform. the template includes tabbed navigation, MVVM, settings, and more. You can follow below steps for Host in the cloud.
Step 1: Select master detail template.
Step 2: Select “Host in the cloud” and click on Okay
Step3: Create / Login Azure Account and configure the application and Click on Create


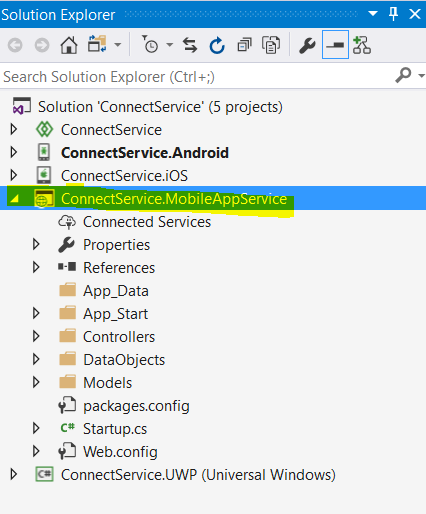
Step 4: you can refer following solution structure .its automatically MobileAppService added
And debug and run application


If you have any question /feedback /issue, write in the comment box.

Thursday, March 2, 2017

Getting Started with Google and Bing Maps using Xamarin.Forms


Introduction :

Xamarin allows us to integrate maps in our all the platform mobile application. Google and Bing maps combines the power of Xamarin maps. You can show any location on the map, show different routes on the map e.t.c. You can refer below image for quickly learn about map implementation using  xamarin.forms .In this Article ,I have shared very detail about xamarin forms maps implementation .

Download Source Code :
Step 1: Setup new Xamarin.Forms Application:
Let's start with creating a new Xamarin Forms Project in Visual Studio.

Open Run > Type Devenev.Exe and enter > New Project (Ctrl+Shift+N) - select Portable Blank Xaml App
http://csharpcorner.mindcrackerinc.netdna-cdn.com/article/generate-google-api-key-for-xamarin-android-application/Images/image002.jpg
It will automatically create multiple projects like Portable, Android, iOS, UWP. You can refer to my previous article for more.
  • How to Create Your First Xamarin.Form Application - http://www.c-sharpcorner.com/article/how-to-create-first-xamarin-form-application/
Note:
UWP is available in Xamarin.Forms 2.1 and above, and Xamarin.Forms.Maps is supported in Xamarin.Forms 2.2 and above so make sure update xamarin Forms nuget package
Step 2: Install Xamarin.Forms.Maps nuget Package:
Xamarin.Forms.Maps is a cross-platform nuget package for native map APIs on each platform. Map control android will support google map ,windows and UWP apps will support bing map .
Right Click on Solution > Select “Manage nuget package for project solution “ > Select Xamain.Forms.Maps  > Select all the Project > Click on Install


Step 3: Add Maps control in Portable library:
You can design common xaml design to all the platform from portal library.
  1. Add Xamarin.Forms.Maps namespace from MainPage.xaml
xmlns:maps="clr-namespace:Xamarin.Forms.Maps;assembly=Xamarin.Forms.Maps"


  1. Add customized UI map UI Design like below and if you want show user current add IsShowingUser="True" property from map control.
<?xml version="1.0" encoding="utf-8" ?>
<ContentPage xmlns="http://xamarin.com/schemas/2014/forms"
            xmlns:x="http://schemas.microsoft.com/winfx/2009/xaml"
            xmlns:local="clr-namespace:DevEnvExeMyLocation"
             xmlns:maps="clr-namespace:Xamarin.Forms.Maps;assembly=Xamarin.Forms.Maps"
            x:Class="DevEnvExeMyLocation.MainPage">
 
<StackLayout VerticalOptions="StartAndExpand" Padding="30">
   <maps:Map WidthRequest="960" HeightRequest="700"
       x:Name="MyMap"
       IsShowingUser="True"
       MapType="Street"
       />
 </StackLayout>

</ContentPage>


You can add following code for Zoom and center the user position from MainPage.cs file


using Xamarin.Forms;
using Xamarin.Forms.Maps;

namespace DevEnvExeMyLocation
{
   public partial class MainPage : ContentPage
   {
       public MainPage()
       {
           InitializeComponent();
           MyMap.MoveToRegion(
   MapSpan.FromCenterAndRadius(
       new Position(37, -122), Distance.FromMiles(1)));
       }
   }
}


Step 4: Generate Google map API Key
Android allows us to integrate Google maps in our applications, so we need to generate an API key, using Google developer account. This article shows you how to generate Google map API key from Google developer account.
Refer from my previous article for generate Google map API Key http://www.c-sharpcorner.com/article/generate-google-api-key-for-xamarin-android-application/


http://csharpcorner.mindcrackerinc.netdna-cdn.com/article/generate-google-api-key-for-xamarin-android-application/Images/image001.png
Step 5: Generate Bing Map Application Key
Windows allows us to integrate Bing Maps in our application, so we need to generate an application key using Bing developer account. This article shows you how to generate Bing maps application key from Bing developer account.
Refer from my previous article for generate Bing map API key - http://www.c-sharpcorner.com/article/generate-bing-map-authentication-key-for-windows-based-application/
Internet & Web
Step6: Update info.plist file from iOS Project :
The start from iOS 8, we need to add below two keys from info.plist file
<key>NSLocationAlwaysUsageDescription</key>
   <string>Can we use your location</string>
<key>NSLocationWhenInUseUsageDescription</key>
   <string>We are using your location</string>


Step 7: Xamarin Forms Map initialization
Xamarin.Forms and Xamarin.Forms.Maps is a two different NuGet package that added to all the project .While Creating Xamarin Forms project automatically xamarin.Forms nuget package was added and  initialization code was added to all the project .
We are recently added new xamarin.forms.maps nuget to our project so  required to add initialization, after the Xamarin.Forms.Forms.Init method call.
iOS
Go to iOS project > open AppDelegate.cs file > in the FinishedLaunching method > after global::Xamarin.Forms.Forms.Init(); > Add below line code
Xamarin.FormsMaps.Init();


Android
Go to Android  project > open MainActivity.cs file > in the OnCreate method > after     global::Xamarin.Forms.Forms.Init(this, bundle); > Add below line code
Xamarin.FormsMaps.Init(this, bundle);


I believe, you already generated google API key and add below key from Property/ AndroidManifest.xml under Application Tag  
<meta-data android:name="com.google.android.geo.API_KEY "
           android:value="Add API Key – Refer Step 4" />


Windows ( WinRT ,Windows Phone,UWP) :
Go to Windows project > open MainPage.xaml.cs file > in the MainPage constructor > after LoadApplication() method > Add below line code
Xamarin.FormsMaps.Init("INSERT_AUTHENTICATION_TOKEN_HERE -refer step 5");


Step9: Enable Required Permissions:
You'll also need to enable appropriate permissions on Android and windows project.
Android:
Right-clicking on the Android project and selecting Property > select on Android manifest > Enable the location specified permissions android.
Windows Project:
Open on the windows Package.appxmanifest file  > select on Capabilities > Enable the location specified permissions all windows project.
Step10: Location Privacy Setting on Device:
Before debug and run application you need to enable Location on all devices (iOS,Android,Windows)
Step 11: Installing google Play Services from Android Emulator:
Xamarin.Forms 2.2.0 on Android now depends on GooglePlayServices 29.0.0.1 for maps.
Visual Studio Emulator for Android does not include Google Play Services. This means that several APIs, including support for Google Maps, are not supported by default. To install Google Play Services, follow below steps
  1. Download the Google Apps package from Team Android http://www.teamandroid.com/gapps/
  2. Verify Device Android Version like GApps: CyanogenMod 11 / Android 4.4 KitKat and download
  3. Drag and drop the downloaded .zip package into the running android emulator and wait for installation complete
  1. the emulator will shut down and restart. To verify installation, check that the Play Store app ,gmail,etc  is visible in the app menu
  2. Now you can start use android emulator
Run Application
After complete all above steps, now you can start run all platform apps
C:\Users\DevEnvExe\AppData\Local\Microsoft\Windows\INetCacheContent.Word\Screen Shot 2017-03-02 at 12.14.44 AM.PNG


Issues and Resolutions:
I have shared below some implementation, Development, issues and solution
https://lh3.googleusercontent.com/EYy1QMBWQZlpWffrO4hZbxZBNU1tHpmXDPgC2cUPFtgQ4YSuH_Yr7LE247RKuXnaOI8n4d60Vn5vm-CwC80H1FAuTZRkMO22217p3WcLisT0dmigUVW1Lvg5gkRPjdeIPlEFcln6BG20-0rP5A
Error:
Building in Android: Java Out of Memory Error
Solution:
Go to Android project options and set, Build/Android Build > Advanced tab > set 1G (or something) in Java heap size.

If you have any question /feedback /issue, write in the comment box