
Introduction:
The Mobile application most frequent feature requirement called online and Offline feature. In Online Mode, mobile apps exchange data over networks using cloud storage.
In offline Mode, mobile apps only need to store data in mobile storage on locally. With simple, unstructured data, such as user settings, options and cloud download data, applications can store information inside local files or local database.
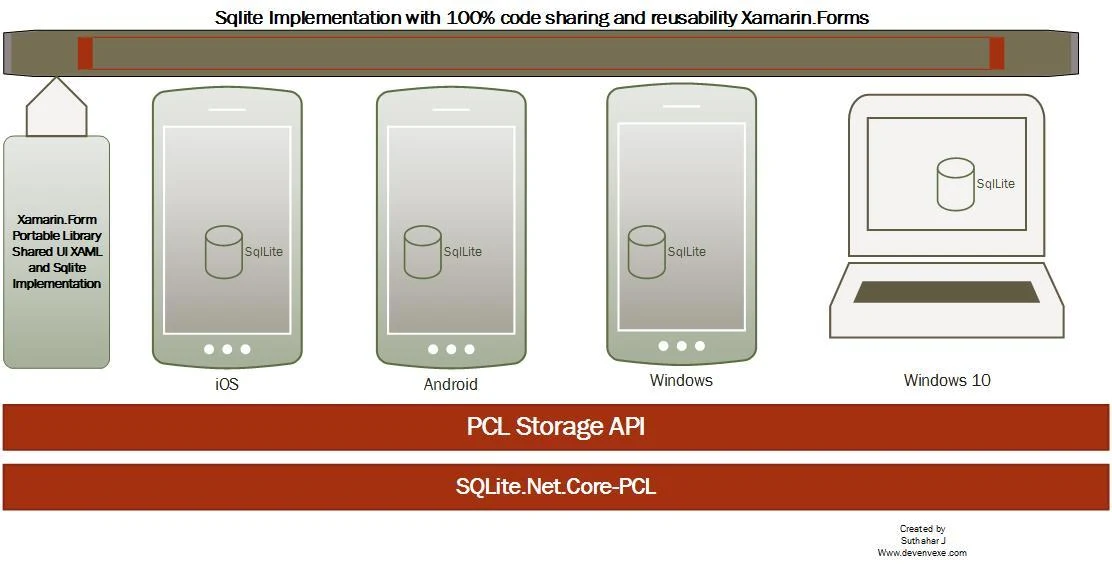
This article will be shown a step by step guide on how to use a SQLite database with a Xamarin Forms application in iOS, Android, Windows Universal application. I have seen most of the article in SQLite implementation but everywhere they are used Dependency and creating database in platform specific code.
The Sample Shown below about Cross Mobile local database in Xamarin Forms using SqLite with 100% code re-use to all the platform.
Step 1: Create New Xamarin Form Application:
Create new Xamarin Form application using visual studio 2015 or Xamarin Studio. You can refer in my previous article for create new xamarin Form Application. http://www.c-sharpcorner.com/article/how-to-create-first-xamarin-form-application/
Step 2: Add SQLite NuGet Package:
After create Xamarin Form application, you need managed way to access Sqlite database. you need to add reference portable sqlite library from our project.
SQLite-net-pcl is on open source and lightweight library for .NET, Mono, and Xamarin applications. It’s available as a NuGet package with the name sqlite-net-pcl .
Right Click on Solution ➔Manage nugget Package for Solution ➔ Search “Sqlite-net-pcl” ➔ select all platform project ➔ Click on Install

Step 3: Add PCLStorage Package:
PCL Storage provides a consistent, portable set of local file IO APIs for .NET, Windows Phone, Windows Store, Xamarin.iOS, Xamarin.Android and Silverlight. This makes it easier to create cross-platform .NET libraries and apps.
Here, we need to save Sqlite database to all the platform local storage so getting local storage path we are using PCLStorage .
Add PCLStorage Nuget package to all the projects. Right click on Project Solution ➔ Click “Manage NuGet package for Solution “ ➔ Search and select “PCLStorage” ➔ Select all the Projects ➔ Click Install.

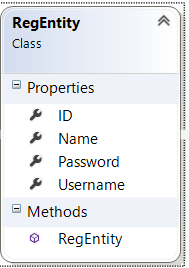
Step 4: Create Entity For table:
You have create one Data Model Entity with below table Column .
Step 4: Create SQLHelper Class:
Create New class and add method for Sql connection and Get,Update ,Insert and Delete data.
Right Click Portable Class Library ➔ Add New Item ➔ Select Class and name as “SQLHelper”
Using directives:
You need add following using reference from SqlHelper calss and you need in this class are a two field that stores the connection string and an object that will be used to implement locks on data operations, to avoid database collisions.
using SQLite; using System.Collections.Generic; using System.Linq; using PCLStorage; namespace DevEnvExe_LocalStorage { public class SqlHelper { static object locker = new object(); SQLiteConnection database; |
SQLite Connection:
Sqlite Connection Common for all the platform. The below code will use for get local storage path and create the Sqlite connection .
public SQLite.SQLiteConnection GetConnection() { SQLiteConnection sqlitConnection; var sqliteFilename = "Employee.db3"; IFolder folder = FileSystem.Current.LocalStorage; string path = PortablePath.Combine(folder.Path.ToString(), sqliteFilename); sqlitConnection = new SQLite.SQLiteConnection(path); return sqlitConnection; } |
Create Table:
Now it’s time to implement the class constructor, above method will return DBConnection using that Create table in the Sqlite Database
public SqlHelper() { database = GetConnection(); // create the tables database.CreateTable<RegEntity>(); } |
Get Data:
The Shown below code is get the all register user details.
public IEnumerable<RegEntity> GetItems() { lock (locker) { return (from i in database.Table<RegEntity>() select i).ToList(); } } |
The Shown below code is get the all the user details and filter by user parameter .
public RegEntity GetItem(string userName) { lock (locker) { return database.Table<RegEntity>().FirstOrDefault(x => x.Username == userName); } } |
Insert and Update Data:
The SaveItem method will act as Insert and update. if its ID value is 0 means it will insert the value to sqlite otherwise it will updated on item based ID .
public int SaveItem(RegEntity item) { lock (locker) { if (item.ID != 0) { //Update Item database.Update(item); return item.ID; } else { //Insert item return database.Insert(item); } } } |
Delete Data:
The Shown below code Delete the item based on ID
public int DeleteItem(int id) { lock (locker) { return database.Delete<RegEntity>(id); } } |
SQLHelper Class :
I have included all the helper methods for your reference
Step 4: UI Design:
Login page:
You can create Login Page as per below Design with two entry box and Buttons

Xaml Design:
You can take reference shown below xaml code and addit in your login page
<?xml version="1.0" encoding="utf-8" ?> <ContentPage xmlns="http://xamarin.com/schemas/2014/forms" xmlns:x="http://schemas.microsoft.com/winfx/2009/xaml" xmlns:local="clr-namespace:DevEnvExe_LocalStorage" x:Class="DevEnvExe_LocalStorage.MainPage" Padding="0, 20, 0, 0"> <Grid> <Grid.RowDefinitions> <RowDefinition Height="Auto" /> <RowDefinition Height="Auto" /> <RowDefinition Height="Auto" /> <RowDefinition Height="Auto" /> </Grid.RowDefinitions> <Grid.ColumnDefinitions> <ColumnDefinition Width="Auto" /> <ColumnDefinition Width="Auto" /> <ColumnDefinition Width="300" /> </Grid.ColumnDefinitions> <Label Text="Login" Grid.Row="0" Grid.Column="2" FontSize="50" ></Label> <Entry Placeholder="UserID" x:Name="txtuserid" Grid.Row="1" Grid.Column="1" Grid.ColumnSpan="2" ></Entry> <Entry IsPassword="True" x:Name="txtpassword" Placeholder="Password" Grid.Row="2" Grid.Column="1" Grid.ColumnSpan="2" ></Entry> <StackLayout Grid.Row="3" Grid.Column="1" Grid.ColumnSpan="3"> <Button Text="Login" Clicked="Click_Login" ></Button> <Button Text="Registrtion" Clicked="Click_Reg" ></Button> </StackLayout> </Grid> </ContentPage> |
C# Code:
The shown below code is Login Check .If userid and Password already available or not .if it’s not available navigate to Register page else navigate to Edit profile page (Home Page)
RegEntity userDetail = App.Database.GetItem(txtuserid.Text, txtpassword.Text);
Above Get method will return user details.
using System; using Xamarin.Forms; namespace DevEnvExe_LocalStorage { public partial class MainPage : ContentPage { public MainPage() { InitializeComponent(); } async void Click_Reg(object sender, EventArgs e) { await Navigation.PushModalAsync(new Registration()); } async void Click_Login(object sender, EventArgs e) { RegEntity userDetail = App.Database.GetItem(txtuserid.Text, txtpassword.Text); if (userDetail != null) { if (txtuserid.Text != userDetail.Username && txtpassword.Text != userDetail.Password) { await DisplayAlert("Login", "Login failed .. Please try again ", "OK"); } else { await DisplayAlert("Registrtion", "Login Success ... Now Edit your profile ", "OK"); await Navigation.PushModalAsync(new Home(txtuserid.Text)); } } else { await DisplayAlert("Login", "Login failed .. Please try again ", "OK"); } } } } |
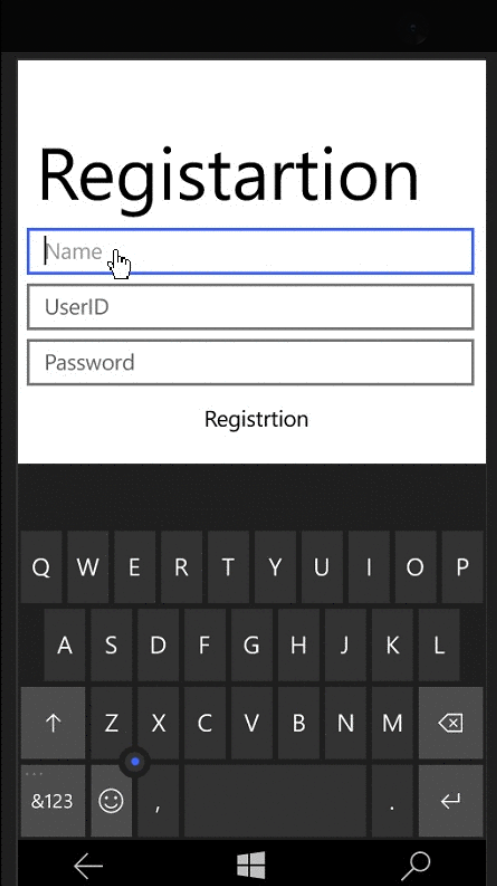
Registration page:
You can create Registration Page as per below Design with 3 entry box and Buttons
Xaml Design :
You can refer below xaml code for registration page design
<?xml version="1.0" encoding="utf-8" ?> <ContentPage xmlns="http://xamarin.com/schemas/2014/forms" xmlns:x="http://schemas.microsoft.com/winfx/2009/xaml" x:Class="DevEnvExe_LocalStorage.Registration" Padding="0, 20, 0, 0"> <Grid> <Grid.RowDefinitions> <RowDefinition Height="Auto" /> <RowDefinition Height="Auto" /> <RowDefinition Height="Auto" /> <RowDefinition Height="Auto" /> <RowDefinition Height="Auto" /> </Grid.RowDefinitions> <Grid.ColumnDefinitions> <ColumnDefinition Width="Auto" /> <ColumnDefinition Width="Auto" /> <ColumnDefinition Width="300" /> </Grid.ColumnDefinitions> <Label Text="Registartion" Grid.Row="0" Grid.Column="2" FontSize="50" ></Label> <Entry Placeholder="Name" x:Name="txtname" Grid.Row="1" Grid.Column="1" Grid.ColumnSpan="2" ></Entry> <Entry Placeholder="UserID" x:Name="txtuserid" Grid.Row="2" Grid.Column="1" Grid.ColumnSpan="2" ></Entry> <Entry IsPassword="True" x:Name="txtpassword" Placeholder="Password" Grid.Row="3" Grid.Column="1" Grid.ColumnSpan="2" ></Entry> <StackLayout Grid.Row="4" Grid.Column="1" Grid.ColumnSpan="3"> <Button Text="Registrtion" Clicked="Click_Reg" ></Button> <Button Text="Already Register ... Login " Clicked="Click_Login"></Button> </StackLayout> </Grid> </ContentPage> |
C# Code:
The below method will save the user details into SQLite database.
RegEntity OReg = new RegEntity();
OReg.Name = txtname.Text;
OReg.Username = txtuserid.Text;
OReg.Password = txtpassword.Text;
int i = App.Database.SaveItem(OReg);
Here, saves method will save the user details. while sending parameter ID value is default 0
using System; using Xamarin.Forms; namespace DevEnvExe_LocalStorage { public partial class Registration : ContentPage { public Registration() { InitializeComponent(); } async void Click_Reg(object sender, EventArgs e) { if (txtuserid.Text != "") { RegEntity fileexist = App.Database.GetItem(txtuserid.Text); if (fileexist == null) { if (txtname.Text != "" && txtpassword.Text != "" && txtuserid.Text != "") { RegEntity OReg = new RegEntity(); OReg.Name = txtname.Text; OReg.Username = txtuserid.Text; OReg.Password = txtpassword.Text; int i = App.Database.SaveItem(OReg); if (i > 0) { await DisplayAlert("Registrtion", "Registrtion Success ... Login and Edit profile ", "OK"); await Navigation.PushModalAsync(new MainPage()); } else { await DisplayAlert("Registrtion", "Registrtion Fail .. Please try again ", "OK"); } } } else { await DisplayAlert("Registrtion Failed", "username already exist .. Please try differnt user name ", "OK"); txtuserid.Text = ""; txtuserid.Focus(); } } } async void Click_Login(object sender, EventArgs e) { await Navigation.PushModalAsync(new MainPage()); } } } |
Home page:
You can create edit profile page like below

Xaml Design :
You can refer shown below code for create update profile page
<?xml version="1.0" encoding="utf-8" ?> <ContentPage xmlns="http://xamarin.com/schemas/2014/forms" xmlns:x="http://schemas.microsoft.com/winfx/2009/xaml" x:Class="DevEnvExe_LocalStorage.Home"> <Grid> <Grid.RowDefinitions> <RowDefinition Height="Auto" /> <RowDefinition Height="Auto" /> <RowDefinition Height="Auto" /> <RowDefinition Height="Auto" /> <RowDefinition Height="Auto" /> </Grid.RowDefinitions> <Grid.ColumnDefinitions> <ColumnDefinition Width="Auto" /> <ColumnDefinition Width="Auto" /> <ColumnDefinition Width="300" /> </Grid.ColumnDefinitions> <Label Text="Registartion" Grid.Row="0" Grid.Column="2" FontSize="50" ></Label> <Entry Placeholder="Name" x:Name="txtname" Grid.Row="1" Grid.Column="1" Grid.ColumnSpan="2" ></Entry> <Entry Placeholder="UserID" x:Name="txtuserid" IsEnabled="false" Grid.Row="2" Grid.Column="1" Grid.ColumnSpan="2" ></Entry> <Entry IsPassword="True" x:Name="txtpassword" Placeholder="Password" Grid.Row="3" Grid.Column="1" Grid.ColumnSpan="2" ></Entry> <StackLayout Grid.Row="4" Grid.Column="1" Grid.ColumnSpan="3"> <Button Text="Update Profile" Clicked="Click_UpdateProfile" ></Button> <Button Text="LogOut" Clicked="Click_Login"></Button> </StackLayout> </Grid> </ContentPage> |
C# Code:
The shown below code Get and update user details in sqlite database
using System; using Xamarin.Forms; namespace DevEnvExe_LocalStorage { public partial class Home : ContentPage { public Home(string userId) { InitializeComponent(); GetUserDetail(userId); } RegEntity userDetail; public void GetUserDetail(string userId) { userDetail = App.Database.GetItem(userId); txtname.Text = userDetail.Name; txtuserid.Text = userDetail.Username; txtpassword.Text = userDetail.Password; } async void Click_UpdateProfile(object sender, EventArgs e) { int i = -1; if (txtname.Text != "" && txtpassword.Text != "" && txtuserid.Text != "") { userDetail.Name = txtname.Text; userDetail.Username = txtuserid.Text; userDetail.Password = txtpassword.Text; i = App.Database.SaveItem(userDetail); } if (i < 0) { await DisplayAlert("Update Profile", "Update Fail .. Please try again ", "OK"); } else { await DisplayAlert("Update Profile", "Profile update Success . ", "OK"); } } async void Click_Login(object sender, EventArgs e) { await Navigation.PushModalAsync(new MainPage()); } } } |
I believe this article will help you to create local SQLite database with 100% code re-use in xamarin .Forms . If you have any question or feedback, please share in comment Box
Thanks for the informative article. This is one of the best resources I have found in quite some time.
ReplyDeleteXamarin Training in Chennai
Xamarin Course in Chennai
German Classes in Chennai
IELTS Coaching in Chennai
Japanese Classes in Chennai
Spoken English Classes in Chennai
spanish classes in chennai
content writing course in chennai
Xamarin Training in OMR
Xamarin Training in Porur
This comment has been removed by the author.
ReplyDeleteAny chance you can demonstrate how to deploy already populated SQLite .db file with mobile app?
ReplyDelete
ReplyDeleteThanks of sharing this post…Python is the fastest growing language that helps to get your dream job in a developing area. It says every fundamental in a programming, so if you want to become an expertise in python get some training
Dot Net Training in Chennai | Dot Net Training in anna nagar | Dot Net Training in omr | Dot Net Training in porur | Dot Net Training in tambaram | Dot Net Training in velachery
I want to post a remark that "The substance of your post is amazing" Great work.
ReplyDeleteData Science Training
Terrific post thoroughly enjoyed reading the blog and more over found to be the tremendous one. In fact, educating the participants with it's amazing content. Hope you share the similar content consecutively.
ReplyDelete360DigiTMG Data Science Course
Extraordinary blog went amazed with the content that they have developed in a very descriptive manner. This type of content surely ensures the participants to explore themselves. Hope you deliver the same near the future as well. Gratitude to the blogger for the efforts.
ReplyDeleteDigital Marketing Course in Bhilai
Honestly speaking this blog is absolutely amazing in learning the subject that is building up the knowledge of every individual and enlarging to develop the skills which can be applied in to practical one. Finally, thanking the blogger to launch more further too.
ReplyDeleteDigital Marketing training in Raipur
Your work ethic is out of this world! The pride you take in your work is truly inspiring.
ReplyDeleteone funnel away challenge
one funnel away challenge
one funnel away challenge
one funnel away challenge
one funnel away challenge
one funnel away challenge
one funnel away challenge
one funnel away challenge
one funnel away challenge
one funnel away challenge